
n the intricate world of 3D printing, the journey from a digital design to a tangible object involves a crucial duo: exporting and slicing. These two processes act as the bridge between the virtual realm of computer-aided design (CAD) and the tangible reality produced by a 3D printer.
Exporting:
Exporting is the initial step, where the digital 3D model is transformed into a format understandable by 3D printing software. The most commonly used formats for 3D printing are STL (Standard Triangle Language) and OBJ (Object). These file types encapsulate the geometry of the model, defining its structure and surface intricacies.
During exporting, meticulous attention is paid to the model’s scale, orientation, and position within the digital space. Errors in these aspects can lead to misprints or inaccuracies in the final product. Ensuring a seamless transition from the digital design to the physical manifestation, exporting lays the foundation for the subsequent slicing process.
Furthermore, some 3D printing software allows for the inclusion of additional information during the export phase, such as color data or material specifications. While the primary focus is on preserving geometric information, these additional details can enhance the richness of the final print.
Slicing:
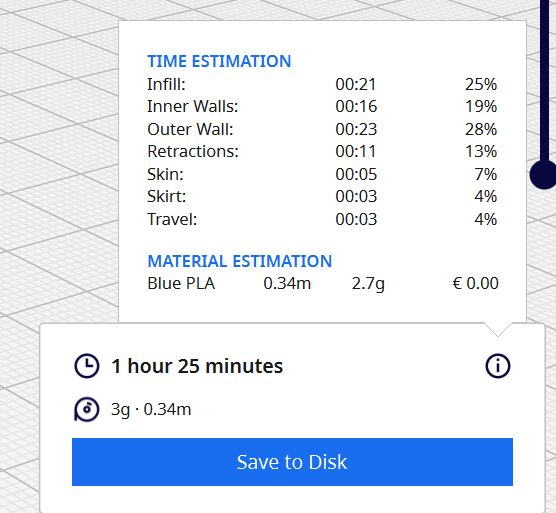
Following the export, the next pivotal phase is slicing, where the 3D model is dissected into thin, horizontal layers. These layers, often referred to as slices, serve as the building blocks for the 3D printing process. Slicing software generates a set of instructions, typically in G-code format, guiding the 3D printer on how to navigate and deposit material layer by layer.
Considerations during slicing are multifaceted and impact the final print’s quality, strength, and appearance. Parameters such as layer height, print speed, infill density, and support structures play pivotal roles. Layer height determines the thickness of each printed layer, influencing surface finish, while infill density dictates the amount of material used to fill the object’s interior, affecting its structural integrity.
Support structures are generated strategically to reinforce overhanging features during printing. These supports, although essential, are designed to be removed post-printing to unveil the final form.
In essence, exporting and slicing are the unsung heroes of 3D printing, transforming digital creativity into tangible reality. The meticulous execution of these processes ensures that the nuances of a designer’s vision are accurately translated into a physical object, opening the doors to a realm of possibilities in additive manufacturing.
Exporting Assemblies and Multi-Part Models
In the realm of 3D printing, designers often work with complex assemblies and multi-part models to create intricate objects or prototypes. Exporting such assemblies involves a set of considerations that go beyond individual models. Here’s an exploration of the key aspects involved in exporting assemblies and multi-part models for 3D printing:
1. Assembly Preparation: Before exporting an assembly, ensure that all individual parts are correctly positioned and oriented relative to each other. Confirm that there are no interferences or collisions between components. If necessary, use assembly constraints or mating features within the modeling software to align and secure parts within the assembly.
2. Grouping Components: Depending on the 3D modeling software being used, consider grouping components into a single assembly file or grouping function. This aids in maintaining the relationships between parts during the export process, making it easier to manage and handle the assembly as a unified structure.
3. File Format Selection: Choose an appropriate file format for exporting assemblies. Common formats include STL and OBJ, but certain software applications may support other assembly-friendly formats like STEP (Standard for the Exchange of Product Data) or IGES (Initial Graphics Exchange Specification). Verify that the selected format preserves the relative positions and orientations of the assembly’s components.
4. Assembly Hierarchy: If the assembly has a hierarchical structure (sub-assemblies within the main assembly), ensure that the hierarchy is maintained during export. This is particularly important for preserving the organization of complex designs and can be critical when importing the assembly into 3D printing software or other applications.
5. Part Naming and Identification: Clearly label and identify each part within the assembly. This helps in maintaining clarity during the export process and assists in post-processing steps such as assembly verification and troubleshooting. Consistent and descriptive naming conventions contribute to efficient organization and communication, especially when collaborating with others or revisiting the project later.
6. Multi-Part Models: For designs that involve multiple distinct parts rather than an assembly, each part must be individually prepared for export. Check the orientation, scale, and overall integrity of each part to ensure a smooth transition to the 3D printing phase. Export each part separately, and consider grouping them in a common folder for better organization.
7. Export Settings and Resolution: Adjust export settings based on the intended level of detail and resolution required for the 3D print. Higher resolution exports may result in larger file sizes but can capture intricate details accurately. Balance the need for detail with considerations for file size and printer capabilities.
8. Testing and Validation: Before initiating the actual 3D printing process, perform tests using 3D printing software or online services that allow the simulation of the printing environment. This step helps identify any potential issues related to part orientation, supports, or other considerations specific to the printing technology being employed.
By paying attention to these considerations when exporting assemblies and multi-part models, designers can seamlessly transition from the virtual design environment to the physical realization of complex structures. Thoughtful preparation ensures that the integrity of the assembly is preserved, and the 3D printing process unfolds smoothly, bringing intricate and multifaceted designs to life.
Checking and Previewing Exported Models
After the meticulous process of creating and setting up a 3D model, the next crucial step before initiating the actual 3D printing is checking and previewing the exported model. This phase is pivotal for identifying potential issues, ensuring printability, and making necessary adjustments. Here’s a comprehensive guide on how to effectively check and preview exported models for 3D printing:
1. Visualization Software: Utilize 3D visualization software to open and inspect the exported model. This software provides a three-dimensional representation of the digital model, allowing designers to examine the geometry, surface details, and overall structure. Commonly used visualization tools include MeshLab, Blender, or the native viewer provided by the 3D modeling software.
2. Rotation and Zooming: Verify the model’s integrity by rotating and zooming in on various sections. This step ensures that there are no unexpected deformities, gaps, or missing elements. A thorough examination from different angles helps catch issues that might not be apparent from a single viewpoint.
3. Layer-by-Layer Inspection: Some visualization software allows for a layer-by-layer inspection, simulating the printing process. This feature is particularly valuable in identifying potential issues that may arise during the actual 3D printing. Evaluate each layer to ensure that the model’s complexity is accurately translated and that there are no unintended artifacts.
4. Overhangs and Support Structures: Pay close attention to areas with overhangs or complex geometries that may require support structures during printing. Ensure that support structures are generated where needed and that they can be easily removed post-printing without causing damage to the model.
5. Checking Dimensions: Verify that the exported model’s dimensions align with the intended real-world size. Discrepancies in scale can lead to unexpected issues during 3D printing, resulting in either oversized or undersized physical models. Cross-reference the dimensions with the original design specifications to ensure accuracy.
6. Printability Analysis Software: Utilize printability analysis tools within 3D printing software or online services. These tools simulate the printing process and highlight potential challenges, such as areas with insufficient thickness or critical overhangs. Addressing these issues before printing can prevent failures and enhance the overall print quality.
7. Material Considerations: Consider the specific material properties of the filament or resin being used for 3D printing. Some materials may have specific requirements or constraints, such as minimum wall thickness or specific print temperatures. Ensure that the exported model aligns with the chosen material’s capabilities.
8. Iterative Adjustments: If issues are identified during the checking and previewing phase, be prepared to make iterative adjustments to the model. Return to the 3D modeling software, implement necessary changes, and re-export the model for further inspection. This iterative process helps refine the model until it is deemed ready for printing.
9. Test Prints: In some cases, consider performing small-scale test prints before committing to a full-sized print. This is particularly useful for complex or intricate designs, allowing designers to assess print quality, identify potential issues, and make adjustments as needed before investing time and materials in a larger print.
By diligently checking and previewing exported models, designers can significantly increase the likelihood of a successful 3D printing experience. This proactive approach minimizes the risk of errors, ensures printability, and ultimately results in high-quality physical objects that accurately reflect the designer’s digital vision.
Configuring Print Settings in Slicing Software
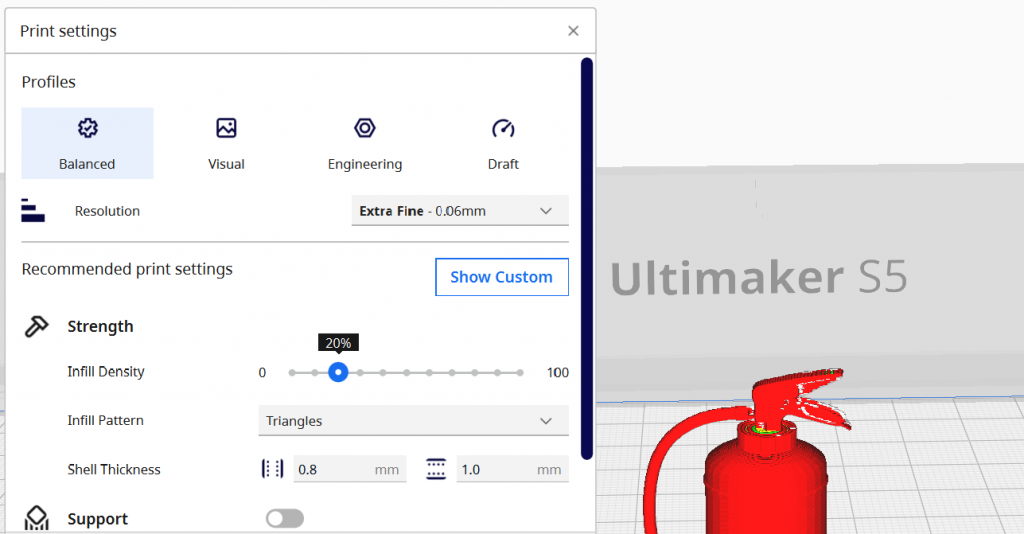
Configuring print settings in slicing software is a critical phase in the 3D printing workflow, as it directly influences the outcome of the printed object. Slicing software serves as the intermediary between the 3D model and the 3D printer, translating the digital design into a series of instructions (G-code) that guide the printer’s movements and material deposition. Here’s a detailed guide on the key aspects of configuring print settings in slicing software:
1. Layer Height: Adjusting the layer height determines the thickness of each printed layer. Smaller layer heights result in finer details and smoother surfaces but can increase print time. Strike a balance between print quality and efficiency based on the requirements of the project.
2. Print Speed: Configure the print speed, controlling how quickly the printer moves during the printing process. Faster print speeds can reduce overall printing time but may impact print quality. Experiment with different speeds to find the optimal balance for your specific model.
3. Infill Density: Infill refers to the internal structure of the printed object. Adjust the infill density to control the amount of material used inside the object. Higher infill provides greater strength but consumes more material and time. For non-structural parts, lower infill may be sufficient, optimizing both speed and material usage.
4. Support Structures: Enable or disable support structures as needed, especially for overhanging features or intricate geometries. Support structures provide temporary scaffolding during printing but must be removed afterward. Configure the support structure settings to balance stability with ease of removal.
5. Raft or Brim: A raft or brim can be added to improve adhesion to the print bed. A raft is a solid layer beneath the entire print, while a brim is a thin extension around the base of the object. Experiment with these options to enhance bed adhesion and reduce the risk of warping.
6. Print Temperature: Set the print temperature based on the characteristics of the filament being used. Different filaments require specific temperatures for optimal extrusion and layer adhesion. Refer to the filament manufacturer’s recommendations and adjust accordingly.
7. Bed Temperature: Adjust the bed temperature to promote proper adhesion between the first layer and the print bed. Bed temperature is especially crucial for materials like ABS, which can warp if the bed is not adequately heated. Ensure the bed temperature aligns with the filament’s requirements.
8. Cooling Settings: Configure the cooling settings to control the fan speed and cooling duration. Proper cooling prevents overheating and improves the overall print quality, especially for small or intricate details. However, too much cooling can impact layer adhesion, so find the right balance.
9. Retraction Settings: Retraction involves pulling the filament back slightly during non-printing movements to prevent oozing or stringing. Adjust retraction settings to minimize these issues. Experiment with retraction distance and speed to find the optimal values for your specific filament and printer.
10. Print Resolution: Choose the print resolution or layer resolution, which determines the level of detail in the final print. Higher resolutions produce finer details but may extend print time. Consider the balance between print quality and time constraints for your project.
11. Bridging Settings: If your model includes bridging (printing over gaps without support), configure the bridging settings. These settings control factors such as fan speed and extrusion during bridging to achieve smoother and more reliable results.
12. Experimental Features: Some slicing software may offer experimental features or advanced settings. Explore these cautiously, as they can provide additional customization options but may also introduce complexities. Only use experimental features after thorough testing and understanding of their impact.
13. Preview and Simulation: Most slicing software provides a preview or simulation feature. Use this to visualize the print layer by layer and identify potential issues before initiating the actual print. Address any concerns in the preview to avoid surprises during the printing process.
By meticulously configuring these print settings in slicing software, designers can optimize the 3D printing process, achieving a balance between print quality, speed, and material efficiency. Regular experimentation, testing, and adjustment of settings contribute to a deeper understanding of the printing dynamics, empowering designers to produce high-quality prints with greater consistency.
Conclusion
Processes of exporting and slicing represent pivotal stages in the 3D printing journey, transforming digital designs into tangible objects with precision and accuracy. The meticulous preparation of the model for export ensures that it seamlessly transitions from the virtual space to the 3D printing realm. Attention to details such as scale, orientation, and structural integrity during exporting lays the foundation for a successful printing experience.
Once the model is exported, the slicing phase becomes a crucial step where the 3D model is disassembled into layers, paving the way for the printer to build the object layer by layer. This process involves thoughtful consideration of various settings, such as layer height, print speed, infill density, and support structures. Configuring these parameters in the slicing software allows designers to strike a balance between print quality, efficiency, and material usage.
Together, exporting and slicing act as the linchpin in the 3D printing workflow, bridging the digital and physical realms. The thorough checking and previewing of exported models serve as a final checkpoint, ensuring that the digital design translates seamlessly into a real-world object. Addressing issues during this phase mitigates potential printing errors, enhances the overall print quality, and fosters a deeper understanding of the intricate interplay between the virtual design and the physical manifestation.
In the dynamic landscape of additive manufacturing, mastering the art of exporting and slicing is key to unlocking the full potential of 3D printing technology. As technology evolves, so too will the methodologies and tools at our disposal, providing continuous opportunities for innovation and pushing the boundaries of what can be achieved in the realm of three-dimensional printing.