
In Blender, hollow models refer to 3D objects that have empty or open spaces inside, creating a shell-like structure. Understanding and creating hollow models can be useful for various purposes, such as designing objects with cavities, creating molds for 3D printing, or simulating objects with interior spaces.
Unlike solid models, which are completely filled, hollow models are designed with voids or interior gaps. Blender provides various tools and techniques to achieve this, allowing artists and designers to create objects with specific internal structures or cavities.
Choosing the Base Geometry
Choosing the appropriate base geometry for creating a hollow model in Blender is a crucial step that influences the efficiency, aesthetics, and functionality of the final result. The selection of base geometry depends on the specific requirements of the project, the intended use of the model, and the ease of achieving the desired hollow structure. Here are considerations and tips for choosing the base geometry:
- Simple Shapes for Beginners:
- If you’re new to 3D modeling or hollow models in Blender, it’s advisable to start with simple shapes like cubes, spheres, or cylinders. These basic shapes are easier to manipulate and understand, making the hollowing process more straightforward.
- Consider the Purpose of the Model:
- The purpose of the hollow model plays a significant role in choosing the base geometry. For example, if the model is intended for 3D printing, consider a shape that aligns with the characteristics of the printing process and material requirements.
- Complex Geometry for Realism:
- For realistic or intricate designs, starting with more complex base geometry can save time and effort. Using advanced modeling techniques or importing detailed models as a base can provide a solid foundation for creating complex hollow structures.
- Functional Requirements:
- The intended function of the hollow model should guide your choice of base geometry. If the model needs to serve a specific purpose, such as a container or a housing for electronic components, consider shapes that accommodate those requirements effectively.
- Symmetry and Repetition:
- Symmetrical shapes or patterns often lend themselves well to hollow modeling. Blender’s mirroring tools and duplication features make it easier to create symmetrically hollowed models, ensuring consistency on both sides.
- Ease of Manipulation:
- Choose a base geometry that is easy to manipulate and modify. Certain shapes may have simpler topology, making it more convenient to add or subtract interior elements without compromising the overall structure.
- Boolean-Friendly Shapes:
- Some shapes are more conducive to Boolean operations, which are commonly used to create hollow models. Shapes like cubes, cylinders, and spheres work well with Boolean modifiers and can facilitate the subtraction or addition of interior geometry.
- Starting with Existing Models:
- If you have access to existing 3D models, especially those with intricate details, you can use them as a starting point for creating hollow structures. Import the model into Blender and adapt it to suit the requirements of your hollow design.
- Consider Printing Orientation:
- If the hollow model is intended for 3D printing, think about the orientation in which it will be printed. Some shapes may require specific orientations to ensure optimal printing results and to avoid support structure issues.
- Experimentation and Iteration:
- Don’t be afraid to experiment with different base geometries. Blender allows for non-destructive modeling, so you can iterate and modify your design easily until you achieve the desired hollow structure.
In conclusion, choosing the base geometry for a hollow model in Blender involves a thoughtful consideration of the project’s requirements, complexity, and intended use.
Creating Hollow Interiors
Creating hollow interiors in Blender involves manipulating 3D geometry to form objects with empty spaces or voids inside. This process is particularly useful for various applications, such as 3D printing, simulation, architectural visualization, and game development. Here’s a step-by-step guide on how to create hollow interiors in Blender:
1. Start with a Base Geometry:
- Begin by creating or importing the base geometry of your object. This could be a simple shape like a cube, sphere, or more complex models depending on your design requirements.
2. Duplicate the Base Geometry:
- Duplicate the base geometry to serve as the internal structure of the hollow model. This duplicate will be modified to create the hollow interior.
3. Scale the Internal Structure:
- Scale down the duplicated geometry to define the thickness of the walls. This scaling operation determines the amount of empty space inside the model.
4. Position the Internal Structure:
- Move and position the scaled-down geometry inside the original object, ensuring it aligns properly. The internal structure should be contained within the outer shell, representing the desired hollow space.
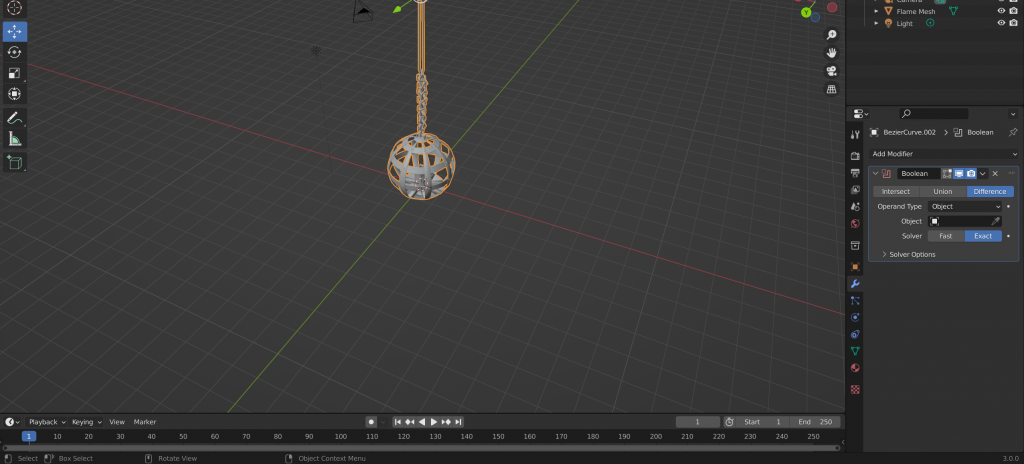
5. Apply Boolean Operations:
- Use the Boolean modifier to perform operations such as Union, Difference, or Intersection. The most common operation for creating hollow models is “Difference,” where the internal structure is subtracted from the external shell. This can be accessed through the Modifier Properties panel.
6. Adjust the Thickness:
- Fine-tune the thickness of the walls by scaling the internal structure or adjusting the parameters of the Boolean modifier. This step allows you to control the overall thickness of the hollow model.
7. Clean Up the Geometry:
- After applying the Boolean operation, inspect and clean up the geometry. Remove any unnecessary vertices, edges, or faces to ensure a clean and optimized mesh. In Edit mode, you can use tools like Merge, Dissolve, and Delete to refine the geometry.
8. Recalculate Normals:
- Ensure that the normals of the model are facing outward. In Edit mode, select all vertices (A key), and then recalculate normals (Shift+N). This step is essential to avoid rendering issues and ensure proper shading.
9. Test the Hollow Interior:
- Toggle between wireframe and solid view modes to inspect the hollow interior. Use the X-ray mode (Alt+Z) to visualize the internal structure and confirm that the model is indeed hollow.
10. Optional: Add Details or Features:
- Depending on your design, you may want to add additional details, features, or internal structures to enhance the complexity and functionality of the hollow model.
Remember to save your work regularly, especially before applying modifiers, to maintain flexibility in your design process. Creating hollow interiors in Blender offers a versatile way to design objects with specific internal configurations, and with practice, you can achieve intricate and functional results.
Optimizing Wall Thickness
Optimizing wall thickness in Blender is crucial, especially when creating 3D models for applications such as 3D printing or simulations. Proper wall thickness ensures structural integrity, printability, and the overall success of your project. Here’s a guide on optimizing wall thickness in Blender:
1. Understand Requirements:
- Determine the minimum acceptable wall thickness based on the capabilities of your 3D printer or the specific requirements of your project. Consider factors such as material properties, structural needs, and the intended purpose of the model.
2. Use the Solidify Modifier:
- Blender’s Solidify modifier is a powerful tool for adding thickness to a 3D model’s surfaces. Select your object, go to the Modifiers Properties panel, and add a Solidify modifier. Adjust the Thickness parameter to achieve the desired wall thickness.
3. Check for Uniformity:
- Ensure that the wall thickness is uniform across the entire model. Inconsistent thickness may lead to printing issues or compromise the structural integrity of the object.
4. Avoid Thin Walls:
- Be cautious about creating walls that are too thin. Thin walls can be fragile and may not be accurately reproduced during 3D printing. It’s advisable to stay above the minimum recommended thickness for your chosen printing technology.
5. Inspect the Internal Structure:
- If your model has a hollow interior, make sure to inspect and optimize the wall thickness of both the exterior and interior surfaces. Use Blender’s X-ray mode (Alt+Z) to visualize the internal structure and confirm that the walls are adequately thick.
6. Check for Overlapping Geometry:
- Overlapping geometry can lead to printing errors. In Edit mode, carefully inspect your model to ensure that there are no intersecting or overlapping faces. Clean up any overlapping geometry to avoid printing issues.
7. Use the Measure Tool:
- Blender provides a Measure tool that allows you to check distances between points. In Edit mode, select two points on opposite sides of a wall, and use the Measure tool (Press N to open the Properties panel and find the Measure option). Verify that the measured distance corresponds to your desired wall thickness.
8. Check for Non-Manifold Geometry:
- Non-manifold geometry, where edges or vertices are not properly connected, can lead to printing errors. Use Blender’s Select Non-Manifold tool in Edit mode to identify and fix any non-manifold issues.
9. Utilize 3D Printing Add-ons:
- Blender has several 3D printing add-ons that can assist in optimizing models for printing. Add-ons like the 3D Print Toolbox can automatically check and highlight potential issues, including thin walls, and suggest corrections.
10. Perform Test Prints:
- Before committing to a large-scale print, consider performing test prints of smaller sections to verify that the wall thickness meets your expectations. This can help you identify and address any issues before investing time and materials in a full-scale print.
By following these steps and paying attention to the specifics of your project, you can optimize wall thickness in Blender to ensure the success of your 3D printing or modeling endeavors.
Managing Internal Structures
Managing internal structures in Blender is an essential aspect of 3D modeling, particularly when creating objects with hollow interiors or intricate internal components. Whether you’re designing for 3D printing, simulation, or animation, effective management of internal structures ensures the model’s integrity and functionality. Here’s a guide on how to handle internal structures in Blender:
1. Plan and Conceptualize:
- Before diving into modeling, have a clear plan for the internal structure. Understand the purpose of the hollow space or internal components and how they contribute to the overall design.
2. Use Separate Objects for Internal Structures:
- Consider creating internal structures as separate objects within the same scene. This modular approach allows for better organization and makes it easier to edit and manage individual components.
3. Boolean Operations:
- Utilize Blender’s Boolean modifiers to combine or subtract one object from another. This is especially useful for creating hollow models or integrating internal components seamlessly. Be mindful of topology and clean up geometry after applying Boolean operations.
4. Naming Conventions:
- Adopt a clear naming convention for objects and components. This is crucial for keeping track of internal structures, especially in complex scenes. Well-organized naming makes it easier to select and manipulate specific elements.
5. Isolate and Hide:
- Blender provides tools to isolate and hide objects selectively. Use the “H” key to hide objects temporarily or “Shift+H” to hide everything except the selected object. This helps focus on specific internal structures during the modeling process.
6. Layers and Collections:
- Leverage Blender’s layers or collections feature to organize objects. Placing internal structures in separate layers or collections allows you to control their visibility and makes it easier to manage complex scenes.
7. X-Ray Mode:
- Activate Blender’s X-Ray mode (Alt+Z) to view internal structures through the outer mesh. This mode is especially useful for visualizing and aligning internal components accurately.
8. Use Grid and Snapping:
- When aligning internal structures, enable the grid and snapping options. This ensures precise positioning and alignment of components within the model.
9. Duplication and Symmetry:
- Duplicate and mirror internal structures to maintain symmetry. Blender offers powerful duplication tools, and maintaining symmetry simplifies the modeling process and ensures consistency.
10. Separate Modeling and Editing:
- Consider modeling internal structures separately before combining them with the main object. This approach allows for focused editing, making it easier to refine and adjust internal components without affecting the entire model.
11. Check for Intersections:
- Regularly check for intersections between internal structures and the outer mesh. Intersecting geometry can lead to rendering and printing issues. Blender’s Boolean operations may leave small artifacts that require manual cleanup.
12. Optimize for 3D Printing:
- If your model is intended for 3D printing, optimize internal structures for printability. Ensure that the internal components have adequate thickness and won’t cause printing problems like overhangs or unsupported geometry.
13. Test Renders and Prints:
- Before finalizing the project, perform test renders and, if applicable, test prints. This helps identify any issues with the internal structures and ensures that the model meets your design specifications.
By following these practices, you can effectively manage internal structures in Blender, whether you’re creating hollow models, simulating internal dynamics, or enhancing the functionality of your 3D designs.
Conclusion
Creating a hollow model in Blender is a versatile and essential skill that opens up a myriad of possibilities for 3D designers and artists. The process involves thoughtful consideration of the intended purpose, meticulous planning, and adept utilization of Blender’s powerful modeling tools. By following key steps such as selecting the appropriate base geometry, employing Boolean operations, optimizing wall thickness, and managing internal structures, designers can achieve intricate and functional hollow models.
Blender’s flexibility and feature-rich environment provide the necessary tools for both beginners and experienced 3D modelers to bring their hollow creations to life. The Solidify modifier, Boolean operations, X-Ray mode, and other functionalities empower users to craft hollow models suitable for diverse applications, including 3D printing, simulations, architectural visualizations, and game development.
As technology continues to advance and the demand for complex 3D designs grows, the ability to create hollow models becomes increasingly valuable. Whether it’s for the efficiency of material usage, weight reduction, or the accurate representation of internal structures, mastering the art of hollow modeling in Blender equips designers with the skills needed to meet the demands of various industries.
In the iterative and creative process of making hollow models, experimentation, attention to detail, and a thorough understanding of the design’s intended use are paramount. Regularly saving different versions of the project, performing test prints or renders, and addressing issues as they arise contribute to a successful and refined final product.
In the dynamic world of 3D modeling, the journey of making a hollow model in Blender not only enhances technical proficiency but also encourages artistic expression and innovation. Through a combination of creativity, technical skill, and a deep understanding of the design’s purpose, designers can produce hollow models that captivate, inform, and serve their intended functions effectively.