
3D printing has become an increasingly popular method for turning digital designs into physical objects, and Blender, a powerful and open-source 3D creation suite, provides a robust platform for creating models that can be translated into tangible items. When working with Blender for 3D printing, there are several key considerations to keep in mind to ensure successful and accurate prints.
- Model Accuracy and Scale:
- Unit System: Ensure that Blender is set to the correct unit system, typically metric, to maintain accurate scale for 3D printing. Most 3D printers use millimeters, so it’s essential to work with consistent units.
- Scale: Pay attention to the scale of your model. Use the scene scale properties to adjust the size of your object to match the desired dimensions for 3D printing. Incorrect scaling can result in prints that are too small or too large.
- Mesh Integrity:
- Manifold Geometry: 3D printers require watertight, manifold (solid) geometry. Ensure your mesh is free of non-manifold geometry, holes, or other issues that may cause printing errors. The “3D Print Toolbox” add-on in Blender can help identify and fix these issues.
- Normals: Check and recalculate normals to ensure they are facing outward. Inconsistent or inverted normals can lead to printing problems and imperfections in the final object.
- Overlapping Geometry: Avoid intersecting or overlapping geometry, as it can confuse the 3D printing software and result in errors during the slicing process.
- Printability Considerations:
- Support Structures: For overhangs or intricate details that may sag during printing, consider adding support structures. Blender provides tools for generating support structures or manually adding them to your model.
- Print Bed Adhesion: Ensure that your model has a flat base for proper adhesion to the print bed. If needed, use features like a brim or raft to enhance bed adhesion and stabilize the print.
- Minimum Feature Size: Be aware of the minimum feature size your 3D printer can reliably reproduce. Adjust details and dimensions accordingly, keeping in mind the limitations of the printer’s capabilities.
By considering these aspects, you can enhance the compatibility of your Blender models with 3D printing processes, leading to successful and accurate physical reproductions of your digital designs. Regularly checking and optimizing your models for 3D printing will contribute to a smoother workflow and better end results.
Commonly Used Modifiers for 3D Printing
Modifiers in Blender are powerful tools that allow users to dynamically control and alter the geometry of 3D models. When preparing models for 3D printing, certain modifiers can be particularly useful for optimizing geometry, improving printability, and enhancing overall print quality. Here are some commonly used modifiers for 3D printing in Blender:
- Solidify Modifier:
- Purpose: The Solidify modifier adds thickness to a mesh by extruding its faces along the normals. This is useful for giving thin models some volume, ensuring they are suitable for 3D printing.
- Application: Apply the Solidify modifier to thin-walled objects to ensure they have a minimum thickness, preventing printing issues and making the object more robust.
- Decimate Modifier:
- Purpose: The Decimate modifier simplifies a mesh by reducing the number of vertices while preserving its overall shape. This can be useful for reducing file size and optimizing geometry for 3D printing.
- Application: Use the Decimate modifier to reduce the vertex count of complex models without compromising essential details, making the model more manageable for 3D printing.
- Remesh Modifier:
- Purpose: The Remesh modifier changes the topology of a mesh, creating a more uniform distribution of vertices. It’s beneficial for generating a clean and evenly distributed mesh suitable for 3D printing.
- Application: Apply the Remesh modifier to models with uneven or messy geometry, ensuring a more uniform structure that is easier to work with during the 3D printing process.
- Boolean Modifier:
- Purpose: The Boolean modifier combines or cuts out parts of one mesh using the geometry of another. This is useful for creating complex shapes by combining or subtracting multiple objects.
- Application: Employ Boolean operations to create intricate details or combine multiple objects into a single printable model. Ensure that the resulting mesh is clean and manifold after using Boolean operations.
- Mirror Modifier:
- Purpose: The Mirror modifier duplicates and mirrors a mesh across a specified axis. This is particularly handy for creating symmetrical models efficiently.
- Application: Use the Mirror modifier when designing symmetrical objects to work on only one half of the model, saving time and ensuring perfect symmetry.
- Bevel Modifier:
- Purpose: The Bevel modifier adds beveled edges to a mesh, which can enhance the appearance of a model and prevent sharp angles that might cause printing issues.
- Application: Apply the Bevel modifier to rounded edges and corners, giving the model a more finished and polished look while ensuring that the printer can handle the geometry.
- Subdivision Surface Modifier:
- Purpose: The Subdivision Surface modifier smoothens a mesh by subdividing its faces, resulting in a higher resolution and a more refined surface.
- Application: Use the Subdivision Surface modifier to increase the level of detail in your model. Be cautious with high subdivision levels, as they can significantly increase file size and complexity.
- Array Modifier:
- Purpose: The Array modifier duplicates and arranges a mesh in a specified pattern. This is useful for creating repeated elements or arrays of objects.
- Application: Apply the Array modifier to create repetitive patterns or duplicate objects along a specific axis. This can be helpful for designing modular components or structures.
When using modifiers for 3D printing in Blender, it’s essential to regularly check the resulting geometry, ensuring that the model remains manifold, free of non-manifold geometry, and suitable for successful printing. Experimenting with these modifiers in combination can help achieve the desired level of detail, optimization, and printability for your 3D-printed objects.
Applying Modifiers for 3D Printing
Applying modifiers in Blender is a crucial step in the 3D printing workflow, as it allows you to finalize and prepare your model for the printing process. While modifiers provide a non-destructive way to interactively edit your 3D mesh, applying them makes the changes permanent in the object’s geometry. Here’s a step-by-step guide on applying modifiers for 3D printing in Blender:
- Model Preparation:
- Before applying modifiers, ensure that your 3D model is structurally sound, free of non-manifold geometry, and has the desired level of detail.
- Order of Modifiers:
- Consider the order in which modifiers are applied. The sequence matters, and different results can be achieved by changing the order. For example, applying a subdivision surface modifier before a solidify modifier will yield a different result than applying them in reverse order.
- Apply Modifiers Sequentially:
- Apply modifiers one at a time, starting from the top of the modifier stack. To do this, select the object, go to the “Modifiers” tab in the Properties panel, and click the “Apply” button next to the specific modifier.
- Solidify Modifier:
- If you’ve used the Solidify modifier to give thickness to thin-walled objects, apply it to ensure the thickness becomes part of the actual geometry. This is crucial for 3D printing to avoid hollow or non-manifold structures.
- Mirror Modifier:
- If you’ve used the Mirror modifier for symmetry, apply it to create a complete, non-mirrored mesh. This step is necessary if you intend to edit or sculpt on both sides of the model independently.
- Subdivision Surface Modifier:
- Apply the Subdivision Surface modifier if you used it to increase the mesh’s resolution. Keep in mind that high subdivision levels can significantly increase the model’s complexity and file size.
- Bevel Modifier:
- Apply the Bevel modifier to finalize any beveled edges. This helps in creating smoother transitions between faces, preventing sharp angles that may cause printing issues.
- Boolean Modifier:
- If you’ve used Boolean operations to combine or cut out parts of the mesh, apply the Boolean modifier. This ensures that the resulting geometry is integrated into a single, manifold mesh.
- Decimate Modifier:
- If you used the Decimate modifier to simplify the mesh, apply it to make the reduction in vertex count permanent. This can be beneficial for optimizing the file size and improving the model’s performance during printing.
- Clean Up Geometry:
- After applying modifiers, inspect the geometry for any artifacts or imperfections. Manually edit the mesh if needed, ensuring it remains manifold and suitable for 3D printing.
By following these steps and applying modifiers in a thoughtful sequence, you can prepare your 3D model for successful printing. Regularly check the model’s geometry and run it through slicing software to ensure it meets the requirements of your chosen 3D printer and produces the desired print quality.
Customizing Modifiers for 3D Printing
Customizing modifiers in Blender for 3D printing involves adjusting their settings to meet specific requirements and optimize the model for the printing process. Each modifier serves a unique purpose, and fine-tuning their parameters can significantly impact the final print. Here’s a guide on customizing some common modifiers for 3D printing:
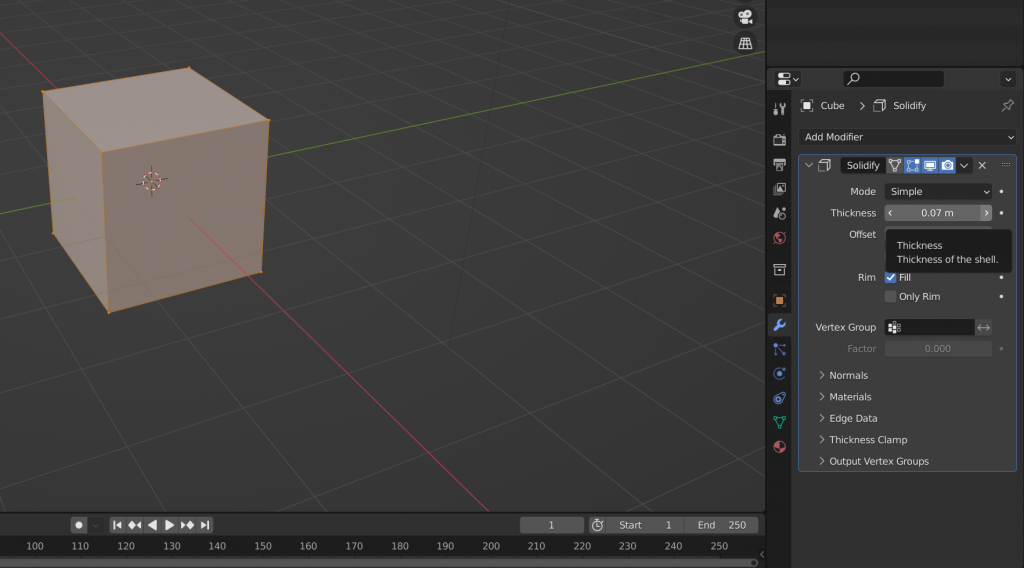
- Solidify Modifier:
- Thickness: Adjust the “Thickness” parameter to determine the thickness of the added geometry. Ensure that the thickness is suitable for 3D printing and provides the necessary structural integrity.
- Even Thickness: Enable “Even Thickness” to maintain consistent thickness across the entire model. This is essential for avoiding uneven walls in thin structures.
- Decimate Modifier:
- Ratio: Use the “Ratio” parameter to control the level of vertex reduction. A lower ratio preserves more details but increases the file size, while a higher ratio reduces details but decreases the file size.
- Planar: Enable “Planar” to simplify flat regions more aggressively. This can be useful for reducing unnecessary geometry while preserving intricate details.
- Remesh Modifier:
- Octree Depth: Adjust the “Octree Depth” to control the level of detail in the remeshed mesh. Higher values result in more detailed geometry but may increase file size.
- Voxel Size: Specify a “Voxel Size” for more control over the remeshing process. Smaller voxel sizes yield higher detail, while larger voxel sizes simplify the mesh.
- Subdivision Surface Modifier:
- Levels: Control the number of subdivision levels. Higher levels create a smoother surface but increase the file size. Consider the balance between detail and file size based on your 3D printer’s capabilities.
- Optimal Display: Enable “Optimal Display” to see the smoothed mesh in the viewport without the need for extremely high subdivision levels.
- Bevel Modifier:
- Width: Adjust the “Width” parameter to control the size of the bevel. Consider the 3D printer’s resolution and the desired level of detail when setting the bevel width.
- Segments: Increase the “Segments” value for a smoother bevel. Higher segments result in more geometry but can enhance the appearance of rounded edges.
- Boolean Modifier:
- Operation: Experiment with different boolean operations such as “Union,” “Difference,” or “Intersect” to combine or subtract meshes. Ensure that the resulting geometry is suitable for 3D printing, and there are no non-manifold issues.
- Solver: Blender offers different boolean solvers (Carve, BMesh). Try different solvers to find the one that produces the cleanest results for your specific model.
- Mirror Modifier:
- Axis: Choose the appropriate mirroring axis (X, Y, Z) based on your model’s symmetry. This ensures that the mirrored side aligns correctly with the original, reducing the chance of errors during printing.
- Merge: Enable “Merge” to automatically merge vertices along the mirror axis. This avoids duplicated vertices at the mirror seam.
- Array Modifier:
- Count: Adjust the “Count” parameter to control the number of duplicates in the array. This is useful for creating repeating patterns or series of connected objects.
- Relative Offset: Experiment with the “Relative Offset” settings to control the spacing between array elements. Ensure that the overall size of the array is suitable for 3D printing.
Customizing modifiers for 3D printing involves a balance between achieving the desired level of detail and optimizing the model for efficient printing. Regularly check the model’s geometry, especially after applying modifiers, to ensure it remains manifold and suitable for successful 3D printing. Experimentation and iteration are key to finding the optimal settings for your specific project and 3D printer.
Troubleshooting and Testing for 3D Printing
Troubleshooting and testing are essential steps in the 3D printing process to ensure successful and high-quality prints. Various factors can affect the outcome, from the 3D model itself to printer settings and environmental conditions. Here’s a comprehensive guide on troubleshooting and testing for 3D printing:
Troubleshooting:
- Layer Adhesion Issues:
- Problem: Weak layer adhesion can result in a brittle print.
- Solution: Adjust the print temperature, ensure proper bed leveling, and experiment with different layer heights.
- Extrusion Problems:
- Problem: Inconsistent extrusion can lead to gaps or over-extrusion.
- Solution: Check the filament diameter settings, clean or replace the nozzle, and calibrate the extruder steps.
- Warped Prints:
- Problem: Prints lifting or warping off the bed during printing.
- Solution: Ensure proper bed adhesion methods (e.g., bed leveling, adhesion aids), use a heated bed, and experiment with different bed temperatures.
- Stringing and Oozing:
- Problem: Thin strings of filament between print features.
- Solution: Adjust retraction settings, lower print temperature, and use a cooling fan to reduce stringing.
- Print Not Sticking to Bed:
- Problem: Initial layers not adhering to the print bed.
- Solution: Level the bed accurately, clean the bed surface, and use adhesion aids like glue stick or hairspray.
- Print Layer Shifts:
- Problem: Layers shifting during the print.
- Solution: Check for obstructions, tighten belts, and ensure the printer is on a stable surface.
- Z-Wobble:
- Problem: Z-axis artifacts causing uneven layer heights.
- Solution: Secure the Z-axis rod, check for bent lead screws, and ensure the Z-axis is properly lubricated.
- Filament Jamming:
- Problem: Filament getting stuck or jamming in the hotend.
- Solution: Clear the nozzle, check for obstructions, and ensure the hotend is at the correct temperature for the filament.
- Under-Extrusion:
- Problem: Insufficient filament being extruded.
- Solution: Check for clogs, ensure the filament is correctly loaded, and adjust the extrusion multiplier.
- Overheating:
- Problem: Parts of the print overheating, leading to print defects.
- Solution: Adjust print speed, use cooling fans for specific layers, and ensure proper ventilation.
Testing:
- Calibration Prints:
- Use calibration prints like the “XYZ Calibration Cube” to check dimensional accuracy and ensure the printer is calibrated correctly.
- Bridging Test:
- Print a bridging test to assess the printer’s ability to span gaps without sagging or drooping.
- Temperature Tower:
- Print a temperature tower to determine the optimal temperature for your filament. This helps identify the temperature range that produces the best print quality.
- Retraction Test:
- Conduct a retraction test to find the ideal retraction settings for your printer and filament, minimizing stringing and oozing.
- Overhang Test:
- Print an overhang test to evaluate the printer’s capability to handle overhanging structures. This helps identify the optimal angle for successful overhangs.
- Layer Height Test:
- Print a test object with varying layer heights to find the balance between print speed and layer resolution for your specific needs.
- Bed Adhesion Test:
- Experiment with different bed adhesion methods (rafts, brims, or supports) to find the one that works best for your printer and material.
- Print Speed Test:
- Adjust print speeds and print a test object to determine the maximum speed that your printer can handle while maintaining print quality.
- Material Compatibility:
- Test different filament types and brands to understand how your printer performs with each material.
- Print Quality Checklist:
- Regularly refer to a print quality checklist to troubleshoot common issues and ensure all aspects of the 3D printing process are optimized.
By systematically troubleshooting and conducting various tests, you can identify and address issues that may arise during the 3D printing process. Regular testing and calibration contribute to consistent and high-quality prints over time. Keep detailed records of your printer settings and the outcomes of different tests to refine your approach and improve print reliability.
Conclusion
Utilization of modifiers in Blender for 3D printing plays a pivotal role in shaping and refining digital models, ensuring they are optimized for successful and high-quality prints. The modifiers discussed, including Solidify, Decimate, Remesh, Subdivision Surface, Bevel, Boolean, Mirror, and Array, offer a versatile toolkit for addressing various considerations in the 3D printing workflow.
By understanding how to apply and customize these modifiers, users can enhance their models, addressing issues such as thickness, geometry complexity, smoothness, and symmetry. The careful application of modifiers not only allows for creative freedom and intricate designs but also facilitates the creation of printable objects that adhere to the technical requirements of 3D printing.
The process of applying modifiers involves a thoughtful sequence, considering factors like thickness, symmetry, and overall mesh complexity. Additionally, customization of modifier parameters provides a fine-tuned control over the model’s characteristics, balancing detail and efficiency for the 3D printing process.
While Solidify ensures structural integrity and proper thickness, Decimate and Remesh modifiers help manage mesh complexity, optimizing file size and printability. Subdivision Surface and Bevel modifiers contribute to smooth surfaces and polished edges, improving the visual appeal of the printed object. Boolean operations, facilitated by the Boolean modifier, enable the creation of intricate shapes through the combination or subtraction of multiple meshes. The Mirror and Array modifiers streamline the design process, allowing for efficient creation of symmetrical or repeated patterns.
In the realm of 3D printing, the effective use of modifiers not only aids in overcoming potential challenges but also empowers creators to bring their digital visions to life in physical form. As the technology continues to evolve, mastering the application and customization of modifiers remains a valuable skill, ensuring that the transition from digital design to tangible objects is seamless and successful.