
Slicing settings refer to the parameters and configurations used in 3D printing software to generate the instructions for a 3D printer. Slicing is a crucial step in the 3D printing process that involves dividing a 3D model into thin layers and generating the toolpaths that the 3D printer will follow to build the object layer by layer. Understanding and appropriately adjusting slicing settings is essential for achieving optimal print quality, speed, and overall performance.
Here are some key slicing settings commonly found in 3D printing software:
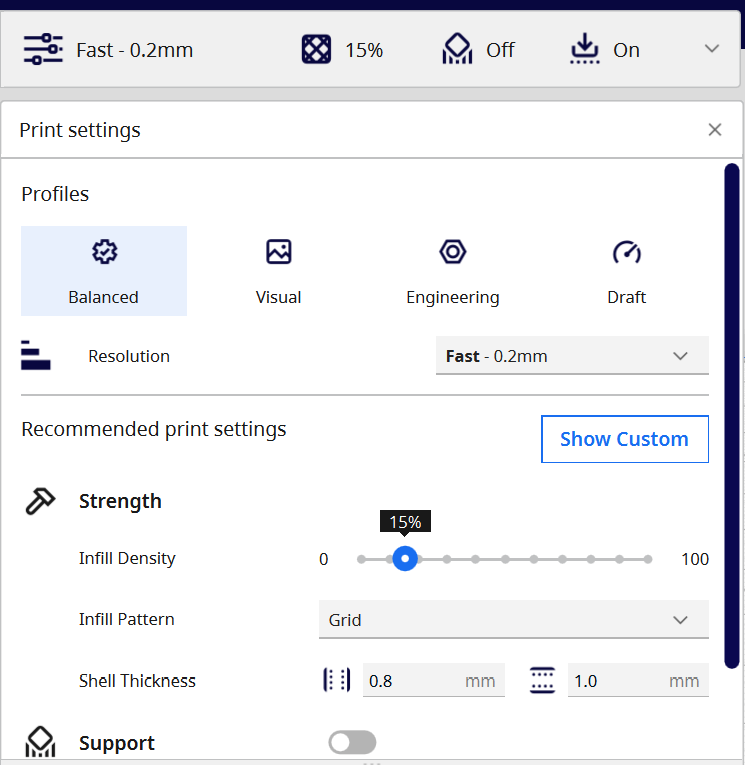
- Layer Height:
- Determines the thickness of each printed layer. Smaller layer heights generally result in finer details but may increase print time.
- Print Speed:
- Dictates how fast the print head moves during different phases of printing. It impacts the overall printing time and can influence print quality.
- Infill Density:
- Specifies the amount of material used to fill the interior of the printed object. Higher infill density increases the strength of the print but also consumes more material and time.
- Supports:
- Enables or disables the generation of support structures for overhanging parts. Supports are temporary structures that prevent drooping or collapsing during printing.
- Brim or Raft:
- A brim is a thin, flat extension around the base of the print, improving adhesion to the build plate. A raft is a thicker, multi-layered structure serving the same purpose.
- Temperature Settings:
- Controls the temperature of the 3D printer’s hotend and heated bed. Proper temperature settings are crucial for material extrusion and bed adhesion.
- Retraction:
- Manages the withdrawal of filament during non-printing moves, preventing oozing and stringing. Proper retraction settings can minimize defects in the print.
- Layer Adhesion:
- Adjusts settings related to the adhesion between layers. This can include parameters like fan speed, cooling, and print temperature.
- Bridging Settings:
- Configures how the printer handles bridging, which is the process of printing over gaps without the support of the layer below.
- First Layer Settings:
- Specifies settings specifically for the initial layer, such as bed adhesion, temperature, and speed, ensuring a solid foundation for the print.
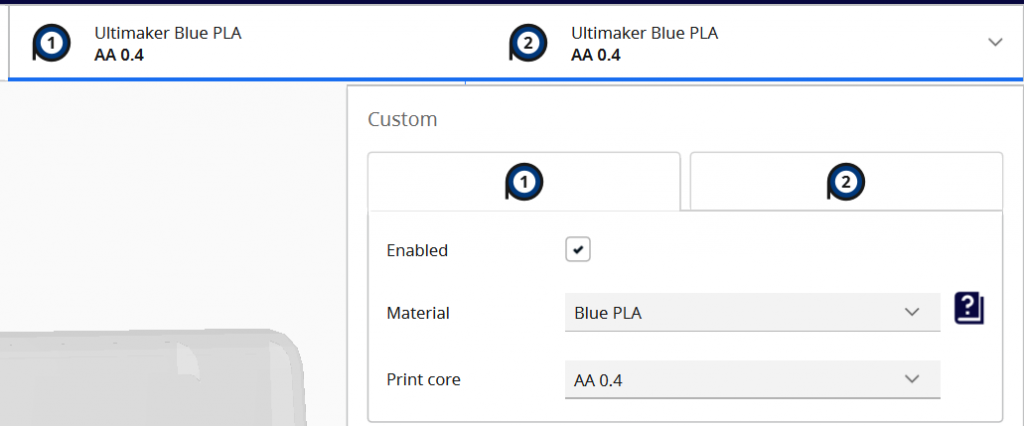
- Filament Type and Diameter:
- Identifies the type of filament being used (PLA, ABS, etc.) and its diameter. Accurate filament settings are crucial for proper extrusion.
- Printer-specific Settings:
- Some slicing software allows users to define the specific parameters for their 3D printer, including the print bed dimensions, nozzle size, and other hardware-related details.
Adjusting these slicing settings allows users to tailor the 3D printing process to meet specific requirements, balancing factors such as speed, quality, and material usage. Experimenting with different settings and understanding their impact on the final print is key to achieving optimal results with 3D printing.
Advanced Slicing Settings
Advanced slicing settings in 3D printing software offer a more nuanced level of control over the printing process, allowing users to fine-tune various parameters for specific applications and desired outcomes. These settings are typically found in the advanced or expert sections of slicing software and require a deeper understanding of 3D printing principles. Here are some advanced slicing settings that experienced users may leverage:
- Coast/Wipe Settings:
- Coasting refers to stopping filament extrusion just before the end of a print move to reduce pressure and prevent oozing. Wipe settings involve moving the nozzle slightly to “wipe off” excess material at the end of a move, minimizing stringing.
- Linear Advance:
- This advanced feature adjusts extrusion rates to compensate for the compression and decompression of filament within the hotend. It helps improve print quality, especially during rapid changes in print speed.
- Pressure Advance:
- Similar to Linear Advance, pressure advance compensates for the pressure changes in the extruder, optimizing filament flow and reducing the likelihood of artifacts like blobs or gaps.
- Firmware Retraction:
- Some 3D printers support firmware-based retraction, allowing users to fine-tune retraction settings directly on the printer’s firmware. This can be more precise than software-based retraction.
- Z-Hop When Retracted:
- Enabling Z-hop causes the print head to lift slightly when moving between non-contiguous areas, reducing the chances of collision with printed features and improving surface quality.
- Modifier Meshes:
- Allows users to apply specific settings to designated regions of the 3D model. This is beneficial for adjusting parameters in areas with intricate details or unique requirements.
- Variable Layer Height:
- Allows users to vary the layer height within a print. This can be useful for achieving finer details in specific sections of a model while maintaining faster print times in less critical areas.
- Adaptive Layer Thickness:
- Adjusts layer height dynamically based on the complexity of the geometry. Fine details may have thinner layers, while larger, less detailed sections may have thicker layers.
- Print Acceleration and Jerk Control:
- Fine-tunes the acceleration and jerk settings of the printer, affecting how quickly it starts, stops, and changes direction. Optimizing these settings can enhance print quality and reduce artifacts.
- Gcode Scripts:
- Allows users to insert custom Gcode commands at specific points in the print job, offering a high level of customization and control over the printing process.
- Vibration Control:
- Some slicing software offers settings to mitigate vibrations during printing, which can be critical for achieving smooth surfaces and avoiding layer misalignment.
- Simultaneous Printing:
- Enables the simultaneous printing of multiple parts, optimizing print time by utilizing available print space more efficiently.
Understanding and experimenting with advanced slicing settings require a combination of experience, knowledge of the specific 3D printer and filament characteristics, and a willingness to fine-tune settings based on the desired outcome. While these advanced settings provide greater control, users should approach them with caution and gradually implement changes to avoid unexpected issues in the printing process.
Slicing for Different Printers and Filaments
Slicing for different printers and filaments involves tailoring the slicing settings to match the specifications and characteristics of specific 3D printers and types of printing materials. As 3D printing technology continues to advance, there’s an increasing variety of printers and filaments available, each with unique features and requirements. To achieve optimal results, it’s essential to consider the following factors when preparing 3D models for printing:
Printer-Specific Considerations:
- Build Volume:
- Adjust the print dimensions to match the maximum build volume of the 3D printer. Oversized models may not fit, and undersized models may not utilize the full print bed.
- Nozzle Size:
- Slicing settings should account for the nozzle diameter of the 3D printer. Using the correct nozzle size ensures accurate extrusion and reliable layer adhesion.
- Bed Type and Temperature:
- Different printers have various bed types, such as heated beds or non-heated beds. Adjust bed temperature settings accordingly to optimize adhesion and prevent warping.
- Extruder Count:
- Some printers have multiple extruders, enabling multi-material or multi-color printing. Slicing software should be configured to manage and coordinate the movements of each extruder.
- Print Speed:
- Take into account the recommended print speed of the specific printer model. Print speeds may vary based on the printer’s design, construction, and motion system.
- Firmware Compatibility:
- Ensure that the Gcode generated by the slicing software is compatible with the firmware of the 3D printer. Some advanced features may require firmware support.
- Bed Leveling:
- Incorporate bed leveling settings to account for any variations in the print bed’s surface. Proper bed leveling is crucial for achieving uniform layer heights.
Filament-Specific Considerations:
- Material Type:
- Different filaments have unique characteristics. Adjust slicing settings to accommodate the specific properties of materials such as PLA, ABS, PETG, TPU, or specialty filaments.
- Extrusion Temperature:
- Set the extrusion temperature based on the optimal range for the chosen filament. Proper temperature control is essential for preventing issues like under-extrusion or overheating.
- Retraction Settings:
- Fine-tune retraction settings to minimize stringing and oozing, considering the viscosity and melting behavior of the filament.
- Print Cooling:
- Adjust fan settings to control cooling during printing, particularly for materials sensitive to overheating. Some filaments benefit from increased cooling, while others require minimal cooling.
- Layer Adhesion:
- Modify layer adhesion settings to suit the filament type. For instance, certain filaments may require higher bed temperatures or additional adhesion aids like rafts or brims.
- Support Structures:
- Tailor support settings to accommodate the characteristics of the filament. Some materials may require more robust supports due to their flexibility or tendency to droop during printing.
- Print Environment:
- Consider the ambient temperature and humidity conditions during printing, as these factors can affect filament behavior. Some materials are more prone to moisture absorption, impacting print quality.
- Printing Speed:
- Adjust overall print speed and layer speed based on the characteristics of the filament. Certain materials may benefit from slower print speeds to achieve better layer bonding.
Adapting slicing settings for different printers and filaments is an iterative process that often involves experimentation and fine-tuning. It’s crucial to consult the documentation provided by the printer manufacturer and filament supplier, as well as relying on user experiences within the 3D printing community. Regularly testing and optimizing settings based on the specific combination of printer and filament used will help achieve the best results for each unique printing scenario.
Layer Adhesion and Cooling
Layer adhesion and cooling are two critical aspects of 3D printing that directly impact the quality and structural integrity of printed objects. Understanding how these factors work together is essential for achieving successful prints. Let’s explore layer adhesion and cooling in more detail:
Layer Adhesion:
Definition: Layer adhesion refers to the strength with which successive layers of 3D-printed material bond together. Strong layer adhesion is crucial for creating structurally sound and durable prints.
Factors Affecting Layer Adhesion:
- Print Temperature:
- Achieving the correct extrusion temperature for the filament is crucial. If the temperature is too low, layers may not bond well, leading to weak adhesion. Conversely, excessive temperatures can cause over-extrusion and negatively impact layer adhesion.
- Bed Temperature:
- The temperature of the print bed also plays a role. Maintaining an appropriate bed temperature ensures that the first layers adhere well to the build surface, promoting overall layer bonding.
- Print Speed:
- The speed at which the printer deposits material can affect layer adhesion. Too fast, and the layers may not have sufficient time to bond; too slow, and over-extrusion may occur.
- Cooling:
- While cooling is essential, excessive cooling can be detrimental to layer adhesion. It’s crucial to find a balance that allows for cooling between layers without causing thermal stress or poor adhesion.
- Filament Type:
- Different filament materials exhibit varying behaviors concerning layer adhesion. Some materials, like ABS, may benefit from an enclosed print chamber to maintain a more stable printing environment and enhance layer bonding.
Techniques for Improving Layer Adhesion:
- Optimized Slicing Settings:
- Adjusting layer height, print temperature, and print speed in the slicing software can have a significant impact on layer adhesion. Fine-tuning these settings based on the specific filament and print conditions is crucial.
- Bed Leveling:
- Ensuring that the print bed is level is essential for achieving uniform layer height across the entire print surface. Inconsistent layer heights can lead to weak adhesion in certain areas.
- Adhesion Aids:
- Using additional adhesion aids like a brim or a raft can improve the initial layer’s attachment to the bed and subsequently enhance overall layer adhesion.
- Enclosed Print Chamber:
- For materials sensitive to temperature variations, enclosing the print chamber can create a more stable environment, reducing the chances of warping and enhancing layer adhesion.
Cooling:
Definition: Cooling in 3D printing refers to the controlled application of fans or other cooling mechanisms to solidify the extruded filament quickly. Proper cooling is essential to maintain print accuracy, enhance overhang performance, and prevent issues like stringing and oozing.
Factors Affecting Cooling:
- Fan Speed:
- The speed at which the cooling fan operates can be adjusted in the slicing software. Higher fan speeds are generally suitable for materials that benefit from rapid cooling, such as PLA.
- Layer Time:
- Slicing software allows users to set a minimum layer time, ensuring that each layer has enough time to cool before the next layer is deposited. This can be especially crucial for small layers and intricate details.
- Bridging Settings:
- Customizing settings for bridging, where the printer spans gaps between supports, can optimize cooling and prevent sagging in these areas.
- Part Orientation:
- Rotating the 3D model to change the orientation of layers relative to the print bed can influence cooling efficiency. Proper orientation can help avoid overheating and improve overall print quality.
Techniques for Improving Cooling:
- Gradual Fan Speed Changes:
- Some slicing software allows for gradual changes in fan speed based on the layer being printed. This can prevent sudden cooling that might impact layer adhesion.
- Cooling Towers or Dummy Objects:
- Including small cooling towers or dummy objects in the print can help divert the cooling airflow, preventing excessive cooling on the main print while still addressing overhangs and small features.
- Customizable Cooling for Specific Layers:
- Advanced slicing settings allow users to customize cooling parameters for specific layers or sections of the print. This can be beneficial when different areas of the print require varying levels of cooling.
- Part Cooling Ducts:
- Some 3D printers come with customizable part cooling ducts that can be adjusted to direct airflow more effectively. Upgrading or optimizing these ducts can enhance cooling performance.
Balancing layer adhesion and cooling is a delicate process that may require experimentation and adjustments based on the specific filament, printer, and print conditions. Users should refer to the recommended settings provided by the filament manufacturer and the 3D printer’s documentation while also considering the unique characteristics of each print job.
Quality vs. Speed Trade-offs
In the realm of 3D printing, achieving a balance between print quality and speed is a constant consideration. The choice between quality and speed often involves trade-offs, as adjustments to printing parameters impact the final outcome. Understanding these trade-offs and making informed decisions is crucial for achieving the desired results in a 3D print. Let’s explore the key factors influencing the quality vs. speed trade-offs:
Quality Considerations:
- Layer Height:
- Lower layer heights result in finer details and smoother surfaces. Choosing a smaller layer height generally enhances overall print quality but increases printing time.
- Print Speed:
- Slower print speeds often lead to better print quality, especially when dealing with intricate details. Reducing print speed allows for more precise layer deposition and improves the overall accuracy of the print.
- Infill Density:
- Higher infill density contributes to stronger and more stable prints. While low infill densities reduce material usage and printing time, they may compromise structural integrity and surface finish.
- Print Temperature:
- Optimal print temperatures vary by filament type. Adjusting print temperatures within the recommended range for a specific filament can impact layer adhesion, overhang performance, and overall print quality.
- Support Structures:
- Adequate support structures are crucial for prints with overhangs or complex geometries. Generating high-quality supports may take additional time but is essential for achieving clean and accurate prints.
- Cooling Settings:
- Proper cooling is essential for preventing issues like stringing and improving overhang performance. Adjusting cooling settings can positively impact print quality but may extend print times.
- Retraction Settings:
- Proper retraction settings minimize stringing and oozing between printed parts. Fine-tuning retraction can enhance the appearance of the final print but may add to the overall print time.
Speed Considerations:
- Layer Height and Print Speed:
- Increasing layer height and print speed can significantly reduce printing time. However, this comes at the expense of print quality, as higher speeds may lead to reduced accuracy and surface finish.
- Infill Density:
- Lowering infill density reduces the amount of material used and speeds up the print. While this can save time, it may compromise the strength and stability of the print.
- Print Speed:
- Higher print speeds can expedite the printing process, but excessive speeds may introduce artifacts such as layer misalignment, ringing, and reduced print accuracy.
- Minimal Supports:
- Generating minimal supports or opting for support-free designs can save time but may limit the complexity of the geometries that can be successfully printed without issues.
- Draft Quality Settings:
- Some slicing software offers draft quality settings that prioritize speed over detail. These settings can be suitable for prototypes and quick iterations but may not deliver the best possible print quality.
Finding the Balance:
- Project Requirements:
- Assess the specific requirements of the 3D print. Prototypes and functional parts may prioritize speed, while intricate models or display pieces may require higher quality.
- Experimentation:
- Iterative testing and experimentation with slicing settings can help find the optimal balance for a given project. This involves adjusting parameters and analyzing the impact on print quality and speed.
- Print Size and Complexity:
- Larger and more complex prints often demand longer print times for higher quality. Smaller, simpler prints may be completed faster without sacrificing much quality.
- Material Choice:
- Different materials have varying printing characteristics. Some filaments may perform well at higher speeds, while others require slower printing for optimal results.
- Prioritizing Features:
- Identify the critical features of the print and prioritize settings that enhance those aspects. This may involve sacrificing speed in favor of achieving specific visual or structural attributes.
- Advanced Settings:
- Explore advanced slicing settings to fine-tune the trade-off between quality and speed. Parameters like acceleration, jerk control, and variable layer height can offer additional customization.
Quality vs. speed trade-off in 3D printing is a delicate balance that depends on the specific requirements of the project. Striking the right balance involves understanding the capabilities of the printer, the characteristics of the filament, and the desired outcome for the 3D print. By carefully considering these factors and experimenting with slicing settings, users can optimize the trade-off to meet their unique needs.
Conclusion
Thorough understanding of slicing settings is paramount for achieving successful and high-quality 3D prints. Slicing serves as the bridge between a digital 3D model and the physical object produced by a 3D printer, making it a pivotal step in the additive manufacturing process. Through a nuanced grasp of slicing settings, users can tailor their prints to meet specific requirements, balancing factors such as print quality, speed, and material usage.
Key considerations, ranging from layer height and print speed to advanced settings like coasting and linear advance, allow users to fine-tune the printing process. Printer-specific settings, including nozzle size, bed type, and extruder count, demand attention to ensure compatibility and optimal performance. Likewise, filament-specific settings, such as material type, extrusion temperature, and cooling, further contribute to the customization of the 3D printing experience.
Navigating the quality vs. speed trade-offs is a crucial aspect of understanding slicing settings. Striking the right balance requires careful consideration of project requirements, print size, material characteristics, and the specific features that demand emphasis. It often involves an iterative process of experimentation, tweaking settings, and analyzing results to achieve the desired outcome.
As 3D printing technology continues to evolve, staying informed about the latest slicing software features and advancements is essential. Leveraging the power of slicing settings empowers users to overcome challenges, address specific print intricacies, and push the boundaries of what is achievable in the realm of additive manufacturing.
In essence, the mastery of slicing settings transforms 3D printing from a mere technological process into a form of digital craftsmanship. It opens up a realm of possibilities for creators, engineers, and enthusiasts alike, enabling them to turn virtual designs into tangible objects with precision and finesse. With a deep understanding of slicing settings, the journey from concept to creation becomes not only technically proficient but also a gratifying exploration of the limitless potential of 3D printing.