
Advanced graphics and shaders play a pivotal role in enhancing the visual quality of games created using Roblox Studio. As an immersive platform that empowers users to develop their own games and experiences, Roblox Studio provides a powerful set of tools that allow creators to push the boundaries of visual fidelity and create stunning virtual worlds. Here, we explore the importance of advanced graphics and shaders in Roblox Studio and how they contribute to enhancing the overall visual quality.
One of the primary advantages of advanced graphics and shaders is their ability to greatly improve the realism and immersion within a game. By employing techniques such as dynamic lighting, realistic shadows, ambient occlusion, and reflections, creators can achieve a level of visual fidelity that draws players into the virtual world. These techniques simulate real-world lighting and shading, making the environments and objects in the game feel more authentic and lifelike.
Furthermore, advanced graphics and shaders allow for the creation of visually stunning effects that can significantly enhance the atmosphere and mood of a game. For example, with the use of particle effects, creators can simulate realistic fire, smoke, water splashes, or even magical spells, adding an extra layer of dynamism and spectacle to the game. These effects contribute to the overall immersion and engage players on a deeper level, making their gaming experience more enjoyable and memorable.
In addition to enhancing realism and atmosphere, advanced graphics and shaders enable creators to create unique and visually distinct art styles for their games. By leveraging different shading techniques, creators can achieve a wide range of artistic effects, from cel-shading to toon shading, from retro pixel art to highly stylized visuals. This artistic versatility allows creators to express their creativity and deliver visually captivating experiences that stand out in the Roblox platform.
Moreover, the availability of advanced graphics and shaders in Roblox Studio helps bridge the gap between professional game development and user-generated content. In the past, complex visual effects and high-quality graphics were often exclusive to games developed by large studios with substantial resources. However, with the introduction of advanced graphics and shaders in Roblox Studio, these tools become accessible to a broader audience. It empowers aspiring game developers, artists, and creators to craft visually appealing experiences without the need for extensive programming or technical expertise.
Furthermore, the inclusion of advanced graphics and shaders in Roblox Studio fosters a sense of innovation and encourages creators to push the boundaries of what is possible within the platform. As developers experiment with different techniques and shaders, they contribute to the overall growth and advancement of the Roblox community. Creators can share their knowledge, collaborate, and inspire each other, resulting in a continuous improvement of visual quality across the platform.
In conclusion, advanced graphics and shaders play a vital role in enhancing the visual quality of games created using Roblox Studio. They bring realism, immersion, and artistic expression to virtual worlds, allowing creators to deliver visually stunning experiences that captivate players. The availability of these advanced tools democratizes visual fidelity, enabling a broader audience to create high-quality games and pushing the boundaries of what is possible within the Roblox platform. As the Roblox community continues to evolve, the inclusion of advanced graphics and shaders ensures that the platform remains at the forefront of visual innovation and creativity.
Basics of graphics rendering
Graphics rendering in Roblox Studio involves the process of generating and displaying visual content in the game environment. It encompasses various techniques and components that work together to create the final visuals seen by the players. Understanding the basics of graphics rendering is crucial for creators in Roblox Studio to optimize performance and achieve the desired visual quality. Here are the key components and concepts involved in graphics rendering in Roblox Studio:
- Rendering Pipeline: The rendering pipeline in Roblox Studio refers to the sequence of stages through which the graphics data passes to be transformed into the final image on the screen. It includes stages like geometry processing, rasterization, shading, and output to the screen. Each stage performs specific operations on the data to generate the visual output.
- Objects and Meshes: In Roblox Studio, objects and meshes are the building blocks of the game environment. Objects represent the various elements in the scene, such as characters, props, and scenery, while meshes define the geometry of these objects. Meshes are made up of vertices, edges, and faces, forming the basic structure of 3D models.
- Materials: Materials define the surface appearance and properties of objects in Roblox Studio. They specify how light interacts with the object, including factors like color, texture, reflectivity, and transparency. By assigning materials to meshes, creators can control the visual characteristics of the objects in the game.
- Lighting: Lighting is a crucial aspect of graphics rendering as it simulates the behavior of light in the virtual environment. Roblox Studio offers various types of lighting sources, such as ambient, directional, point, and spotlights, each serving different purposes. Creators can adjust the intensity, color, and position of these lights to create the desired lighting conditions in their games.
- Shaders: Shaders are programs that run on the graphics processing unit (GPU) and determine how objects are rendered. In Roblox Studio, shaders are written in a language called Roblox Lua and are responsible for performing calculations related to lighting, shading, and special effects. Creators can customize shaders to achieve specific visual effects and enhance the overall appearance of the game.
- Post-Processing: Post-processing effects are applied to the final rendered image to enhance its quality or add specific visual effects. Roblox Studio provides a range of post-processing options, including depth of field, bloom, color grading, and motion blur. These effects can be adjusted to achieve the desired aesthetic and atmosphere in the game.
- Optimization: Graphics rendering performance is crucial for a smooth gameplay experience. Roblox Studio offers optimization techniques to improve performance, such as level of detail (LOD) settings, which reduce the level of detail for objects that are far away, and occlusion culling, which hides objects that are not currently visible to the player. Optimizing graphics rendering ensures that games run smoothly across different devices and reach a wider audience.
Understanding these basics of graphics rendering in Roblox Studio allows creators to effectively utilize the available tools and techniques to achieve their desired visual results. By leveraging objects, meshes, materials, lighting, shaders, and post-processing effects, creators can create visually appealing and immersive experiences for players within the Roblox platform.
Introduction to shaders and their role in graphics rendering
Shaders are an essential component of graphics rendering in Roblox Studio. They play a significant role in controlling how objects and materials appear visually in the game environment. Shaders are programs that run on the graphics processing unit (GPU) and determine how individual pixels are rendered on the screen. Understanding the basics of shaders and their role in graphics rendering is crucial for creators in Roblox Studio to achieve the desired visual effects. Here is an introduction to shaders and their importance in graphics rendering in Roblox Studio:
- What are Shaders? Shaders are small programs written in a specific shading language, such as Roblox Lua, that define the behavior of light and color for individual pixels on the screen. They perform calculations related to lighting, shading, texturing, and special effects to determine the final appearance of objects and materials. Shaders enable creators to manipulate how light interacts with objects, allowing for a wide range of visual effects and styles.
- Vertex Shaders: Vertex shaders operate on individual vertices of a 3D model. They manipulate the position, color, texture coordinates, and other attributes of vertices. Vertex shaders are responsible for transforming the vertices from object space to screen space, applying transformations like scaling, rotation, and translation. They also calculate lighting values and pass them to the pixel shader for further processing.
- Pixel Shaders: Pixel shaders, also known as fragment shaders, work on individual pixels that make up the final image on the screen. They determine the color, transparency, and other visual properties of each pixel based on the information provided by the vertex shader and other variables. Pixel shaders can perform complex calculations to simulate lighting effects, textures, reflections, refractions, and other visual phenomena.
- Material Shaders: In Roblox Studio, material shaders define how objects’ surfaces respond to light and interact with the environment. They control attributes like color, texture, glossiness, reflectivity, transparency, and more. By modifying material shaders, creators can achieve a wide variety of visual effects, from realistic materials like metal and glass to stylized and cartoon-like appearances.
- Customizing Shaders in Roblox Studio: Roblox Studio provides creators with the ability to customize shaders using Roblox Lua. Creators can modify existing shaders or create their own from scratch. By accessing the shader code, they can adjust lighting calculations, color blending, texture mapping, and other parameters to achieve the desired visual effects. This customization allows creators to create unique and visually appealing experiences in their games.
- Role in Graphics Rendering: Shaders are instrumental in creating visually stunning and realistic graphics in Roblox Studio. They contribute to the overall appearance of objects and materials by simulating lighting conditions, shadows, reflections, and other visual phenomena. Shaders also enable creators to implement artistic styles, such as cel-shading, toon shading, or other unique visual effects that define the aesthetics of the game.
- Performance Considerations: While shaders offer immense flexibility and visual capabilities, creators need to be mindful of performance considerations. Complex shaders with numerous calculations can impact the game’s performance, particularly on lower-end devices. It is important to optimize shaders and strike a balance between visual quality and performance to ensure a smooth gameplay experience for players.
In conclusion, shaders play a vital role in graphics rendering in Roblox Studio by controlling how objects and materials appear visually in the game environment. They enable creators to achieve realistic lighting, shading, and visual effects, as well as implement unique artistic styles. By customizing shaders, creators can create visually captivating experiences that enhance immersion and engagement. Understanding shaders and their role in graphics rendering empowers creators to unleash their creativity and deliver visually stunning games within the Roblox platform.
Overview of the shader scripting language in Roblox Studio
In Roblox Studio, shader scripting is performed using a shading language called Roblox Lua. Roblox Lua is a lightweight, easy-to-use scripting language specifically designed for creating shaders and controlling the visual aspects of objects and materials in the game environment. It provides a simplified syntax and a range of functions and variables that allow creators to customize and manipulate shaders to achieve their desired visual effects. Here is an overview of the shader scripting language in Roblox Studio:
- Syntax and Structure: Roblox Lua follows a straightforward syntax similar to other programming languages. Shaders are written as functions that define the behavior of vertices or pixels. Vertex shaders are defined using the
vertexkeyword, while pixel shaders use thepixelkeyword. Shaders can have input and output parameters, allowing data to be passed between different shader stages. - Built-in Functions and Variables: Roblox Lua provides a set of built-in functions and variables that creators can utilize within their shader scripts. These include mathematical functions for calculations, lighting functions to control lighting effects, texture sampling functions for working with textures, and more. Creators can access and manipulate variables such as position, normal, color, and texture coordinates to modify the appearance of objects.
- Lighting and Shading: Roblox Lua provides functions and variables specifically designed for lighting and shading calculations. Creators can control lighting models, ambient lighting, diffuse and specular reflections, and shadowing effects. They can adjust the intensity, color, and direction of lights, as well as control how light interacts with materials to achieve realistic or stylized shading.
- Texturing: Texture mapping is a crucial aspect of shaders in Roblox Studio. Creators can apply textures to objects to add detail, patterns, or visual effects. Roblox Lua provides functions for loading textures and sampling them within the shader script. Creators can adjust texture coordinates, perform texture blending, and apply various texture filtering techniques.
- Customization and Modifications: One of the strengths of shader scripting in Roblox Studio is the ability to customize and modify shaders according to specific requirements. Creators can access and modify existing shaders or create their own shaders from scratch. By manipulating the shader code, creators can adjust lighting calculations, color blending, texture mapping, and other parameters to achieve the desired visual effects.
- Shader Assets: In Roblox Studio, shaders are typically created as Shader Assets. Shader Assets encapsulate the shader script and other related information, such as textures and material properties. Creators can import and assign Shader Assets to objects or materials within the game environment, allowing for easy management and application of shaders.
- Debugging and Testing: Roblox Studio provides tools and features for debugging and testing shaders. Creators can preview the shaders in real-time using the Studio’s built-in preview window or by running the game. This allows for iterative development and immediate feedback on the visual effects achieved through shader scripting.
In conclusion, the shader scripting language in Roblox Studio, based on Roblox Lua, provides creators with the necessary tools and flexibility to control the visual aspects of objects and materials in their games. With functions and variables dedicated to lighting, shading, texturing, and more, creators can customize and manipulate shaders to achieve a wide range of visual effects and styles. Shader scripting in Roblox Studio empowers creators to create visually stunning and immersive experiences by unleashing their creativity and control over the game’s visual appearance.
Writing the shader code
In Roblox Studio, writing shader code allows you to have fine-grained control over the visual effects and appearance of objects and materials in your game. While the Shader Editor provides a visual interface for creating shaders, you may sometimes need to write shader code directly to achieve more complex or specific effects. Here is an overview of writing shader code in Roblox Studio:
- Shading Language: Roblox Studio uses a shading language based on Roblox Lua for writing shader code. Roblox Lua provides a simplified syntax and a range of functions and variables specifically designed for working with shaders.
- Understanding Shader Stages: Shaders in Roblox Studio are typically written as two separate stages: the vertex shader and the pixel shader. The vertex shader operates on individual vertices of a 3D model, while the pixel shader works on individual pixels that make up the final image.
- Accessing Shader Variables: Shader code in Roblox Studio allows you to access various shader variables, such as position, normal, color, texture coordinates, and lighting information. These variables are passed to the shader code automatically and can be used for calculations and manipulations.
- Lighting and Shading Calculations: To achieve realistic or stylized lighting and shading effects, you can write code that performs lighting calculations in the pixel shader stage. This includes calculations for ambient lighting, diffuse and specular reflections, shadows, and more. You can also adjust material properties, such as glossiness or reflectivity, based on the lighting conditions.
- Texture Mapping: Shader code enables you to perform texture mapping, which involves applying textures to objects or materials. You can write code to load textures, sample them within the shader, and control how they are applied to the object’s surface. This allows for precise control over texture coordinates, blending, and transformations.
- Mathematical Operations: Roblox Lua provides a range of mathematical functions that you can use in shader code. These functions enable you to perform calculations for transformations, color blending, procedural texture generation, and other mathematical operations required for achieving specific visual effects.
- Customizing Shader Functions: In addition to built-in functions, you can define your own custom functions in shader code to encapsulate reusable logic. Custom functions can simplify complex calculations, improve code organization, and make the shader code more modular and readable.
- Testing and Debugging: As you write shader code, it is important to test and debug it to ensure it produces the desired visual effects. Roblox Studio provides tools for previewing shaders in real-time using the built-in preview window or by running the game. This allows you to iterate on the shader code and immediately see the results.
- Shader Asset: Once you have written the shader code, you can save it as a Shader Asset in Roblox Studio. This allows you to reuse the shader across multiple objects or materials within your game. You can also share Shader Assets with other creators, facilitating collaboration and the exchange of visually appealing shader effects.
By writing shader code in Roblox Studio, you gain full control over the visual effects and appearance of objects and materials in your game. While it requires more technical knowledge, it offers a higher level of customization and flexibility. Experimenting with shader code enables you to create unique and visually stunning experiences that enhance immersion and engagement in your Roblox game.
Overview of post-processing effects
Post-processing effects in Roblox Studio refer to visual effects that are applied to the rendered image after the scene has been rendered. These effects can enhance the overall look and feel of the game by adding various filters, color grading, distortions, and other visual modifications. Here is an overview of post-processing effects in Roblox Studio:
- Accessing Post-Processing Effects: In Roblox Studio, post-processing effects can be accessed and applied through the Lighting service. The Lighting service provides properties that allow you to control the intensity, quality, and specific effects of post-processing.
- Bloom: Bloom is a post-processing effect that creates a glow or halo around bright areas in the scene. It simulates the way light scatters and spreads in the real world. Bloom can add a sense of realism and visual impact to your game by enhancing the appearance of bright objects or light sources.
- Depth of Field: Depth of Field (DOF) is a post-processing effect that mimics the way the human eye focuses on objects. It allows you to selectively blur the foreground or background of the scene, creating a sense of depth and visual interest. DOF can be used to draw attention to specific objects or create a cinematic look in your game.
- Color Grading: Color grading is the process of altering the colors and tones of the rendered image to achieve a desired mood or style. In Roblox Studio, you can apply color grading effects such as adjusting brightness, contrast, saturation, and hue. Color grading can help set the atmosphere, create different visual styles, or evoke specific emotions in your game.
- Vignette: Vignette is a post-processing effect that darkens the edges of the screen, creating a spotlight-like effect focused on the center of the image. It can add a cinematic touch, draw the player’s attention to the center of the screen, or create a vintage or dramatic look.
- Motion Blur: Motion blur is a post-processing effect that simulates the blur that occurs when objects move quickly in a scene. It adds a sense of motion and realism to fast-paced or dynamic gameplay. Motion blur can be adjusted to control the amount of blur and the strength of the effect.
- Anti-aliasing: Anti-aliasing is a technique used to smooth out jagged edges and reduce pixelation in the rendered image. In Roblox Studio, you can apply post-processing anti-aliasing effects to improve the visual quality of the game. Anti-aliasing helps create sharper and more refined graphics, especially in scenes with diagonal lines or curves.
- Other Effects: Roblox Studio also provides other post-processing effects such as vignette, grain, sepia, saturation, and more. These effects can be combined and customized to achieve the desired visual style and atmosphere for your game.
Post-processing effects in Roblox Studio allow you to elevate the visual quality and aesthetics of your game. By applying bloom, depth of field, color grading, vignette, motion blur, anti-aliasing, and other effects, you can create immersive and visually stunning experiences for players. Experimenting with different effects and settings enables you to find the right combination that enhances the overall look and feel of your game.
Applying effects like bloom, depth of field, and motion blur
Applying effects like bloom, depth of field, and motion blur in Roblox Studio can greatly enhance the visual appeal and immersion of your game. These effects can be achieved by utilizing the post-processing capabilities available in Roblox Studio’s Lighting service. Here’s how you can apply these effects:
- Bloom: Bloom adds a glow or halo effect to bright areas in the scene, simulating the way light scatters and spreads. To apply bloom in Roblox Studio, follow these steps:
- Open Roblox Studio and navigate to the Lighting service. You can find it in the Explorer window under the “Lighting” object.
- In the Properties window, locate the “Bloom” property. Enable it by checking the box.
- Adjust the “Intensity” property to control the strength of the bloom effect. Higher values result in a more pronounced glow.
- Optionally, you can customize the “Threshold” property to control which areas are affected by bloom based on their brightness levels. Lower values include more areas, while higher values limit it to brighter portions of the scene.
- Depth of Field (DOF): Depth of Field adds a blur effect to simulate how the human eye focuses on objects, creating a sense of depth. Here’s how to apply DOF in Roblox Studio:
- Open Roblox Studio and navigate to the Lighting service.
- Locate the “DepthOfField” property in the Properties window and enable it.
- Customize the “Enabled” property of the “DepthOfField” folder to enable or disable the effect.
- Adjust the “FocalLength” property to control the focus distance. Lower values create a closer focal point, while higher values increase the distance.
- Optionally, you can modify the “InFocusRadius” property to control the area around the focal point that remains sharp and in focus.
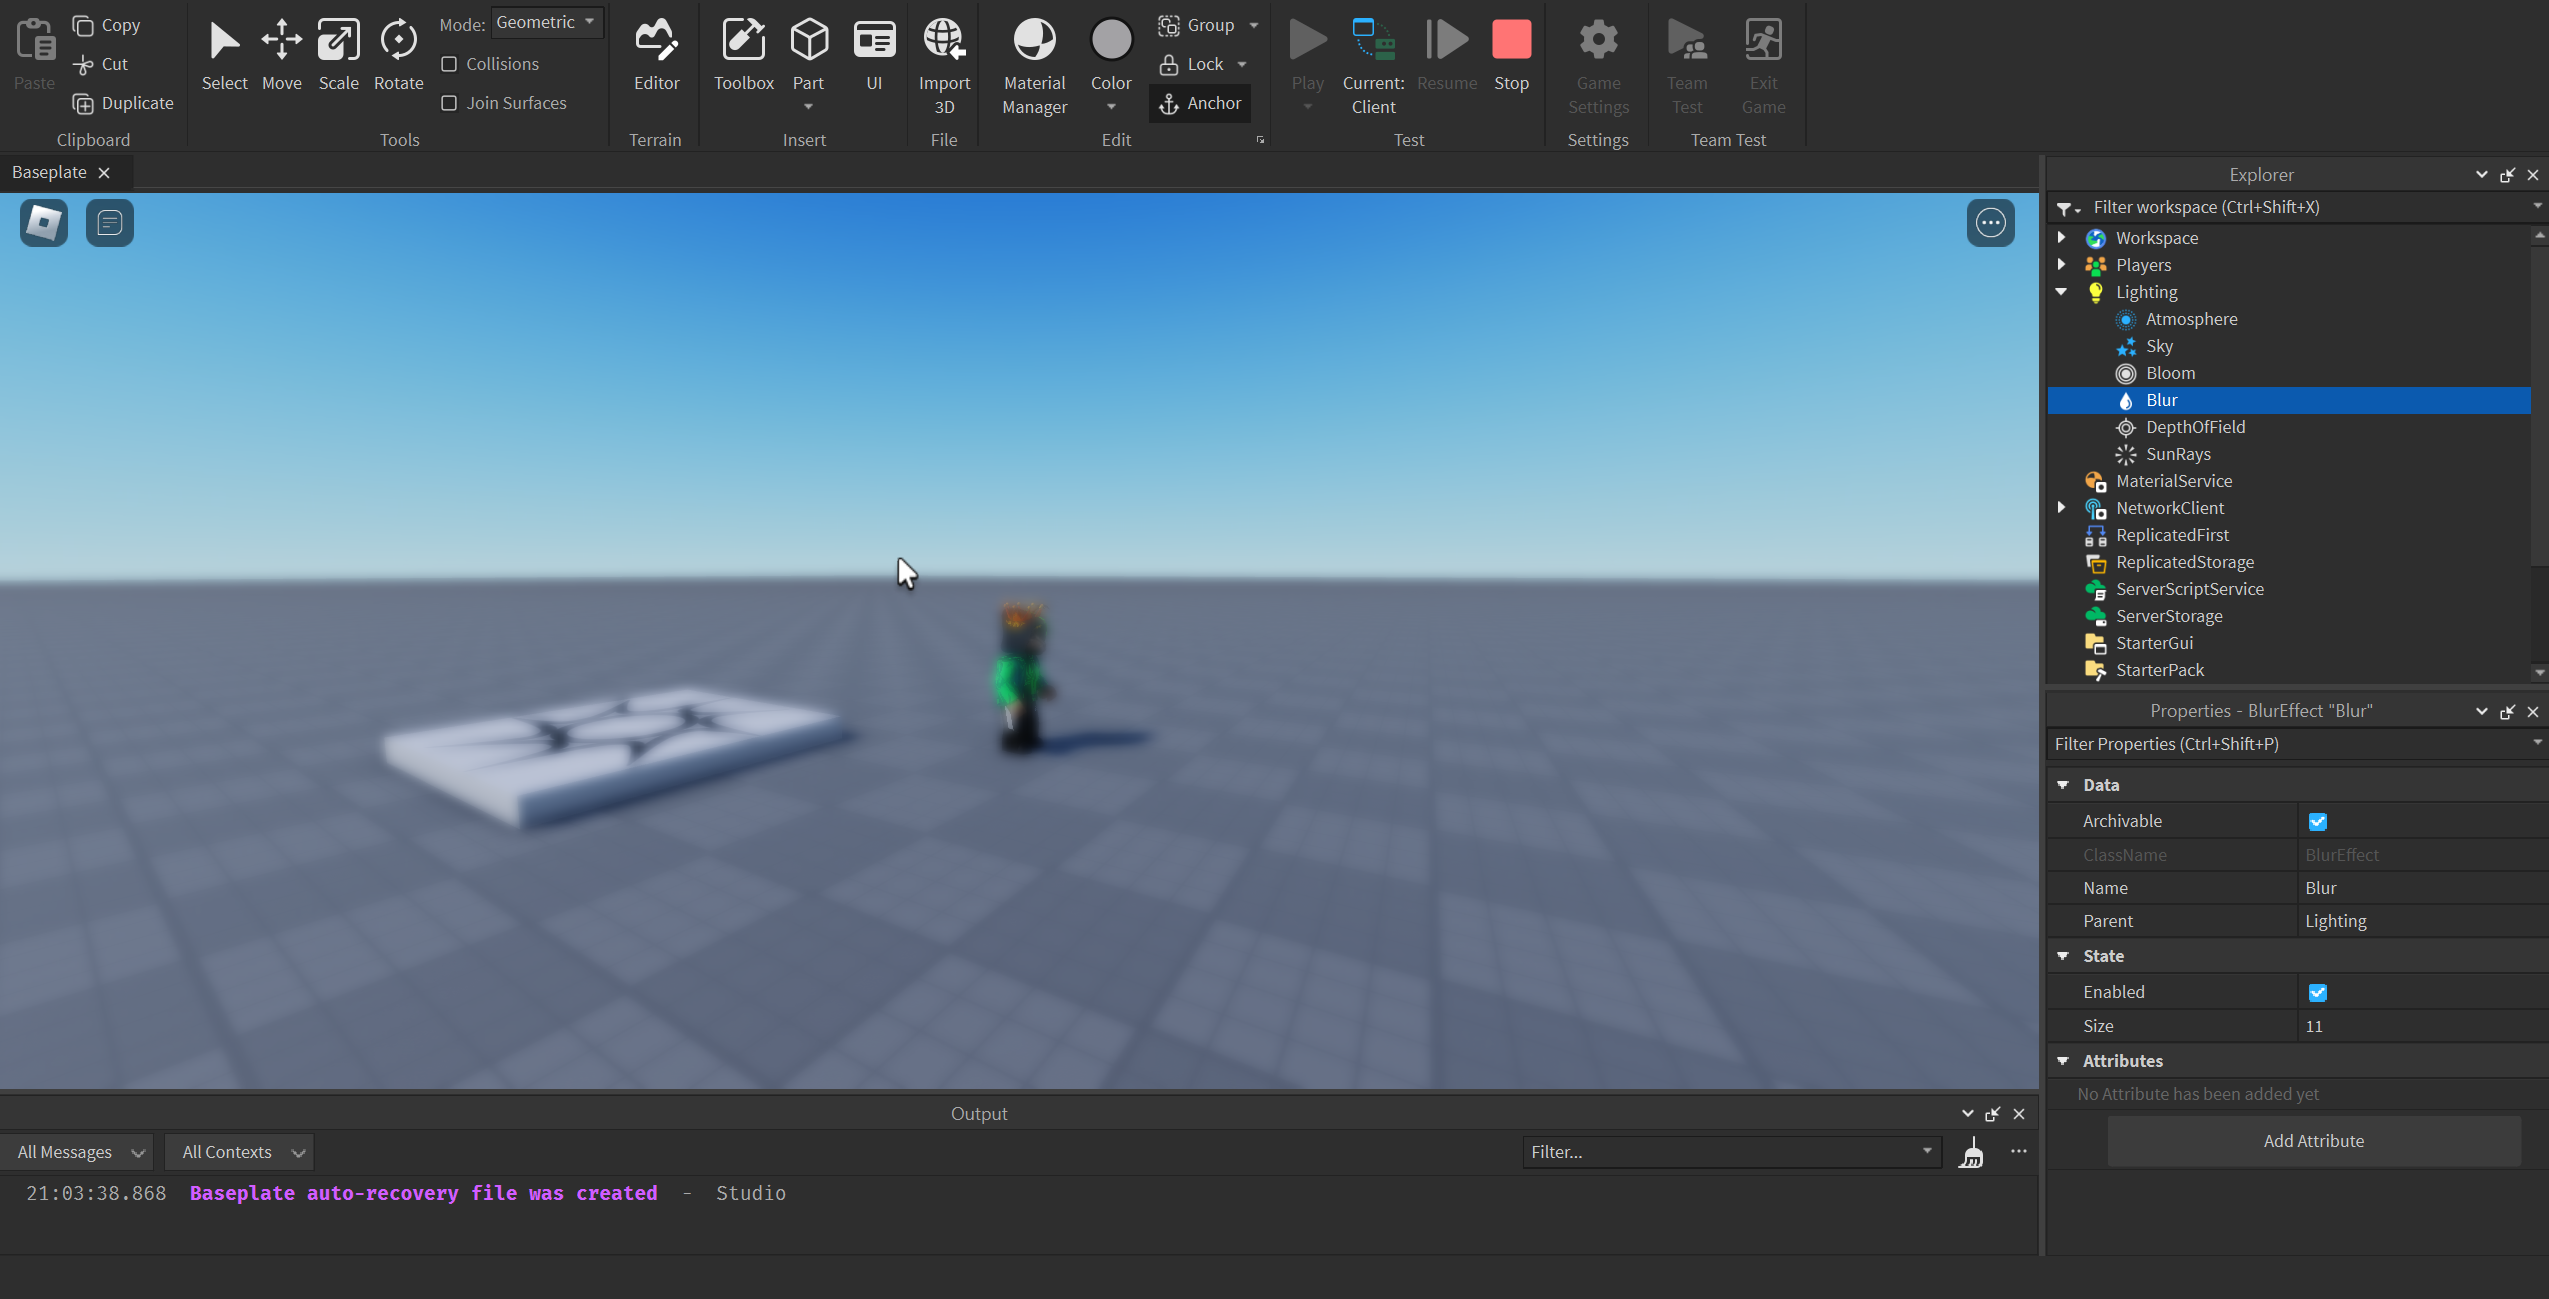
- Motion Blur: Motion blur adds a blur effect to simulate the way objects appear when they are in motion, creating a sense of speed and realism. Follow these steps to apply motion blur in Roblox Studio:
- Open Roblox Studio and navigate to the Lighting service.
- Locate the “MotionBlur” property in the Properties window and enable it.
- Adjust the “Enabled” property of the “MotionBlur” folder to enable or disable the effect.
- Customize the “Size” property to control the strength of the motion blur. Higher values result in a more pronounced blur.
- Optionally, you can modify the “SampleRate” property to adjust the number of samples taken to calculate the motion blur. Higher values provide more accuracy but might impact performance.
By applying bloom, depth of field, and motion blur in Roblox Studio, you can significantly enhance the visual quality and realism of your game. Experiment with different settings to achieve the desired effects and create captivating and immersive experiences for your players.
Understanding material properties
Understanding material properties in Roblox Studio is crucial for achieving the desired visual appearance and behavior of objects in your game. Material properties define how light interacts with surfaces, affecting their reflectivity, transparency, and other visual characteristics. Here’s an overview of the key material properties in Roblox Studio:
- Texture: The texture property allows you to apply an image or texture to the surface of an object. Textures can be used to add details, patterns, or specific visuals to objects. You can either choose from the built-in textures or import your own custom textures. Textures can be tiled, stretched, or rotated to suit your needs.
- Color: The color property defines the base color of the material. It determines how the object appears when no lighting or textures are applied. You can choose a specific color using the RGB values or select from a palette of predefined colors. The color property can be used to create solid-colored objects or provide a base for other visual effects.
- Reflectance: Reflectance determines how much light the material reflects. Higher reflectance values result in more intense reflections, while lower values produce more diffuse surfaces. Reflectance can be used to simulate different types of materials, such as metals or matte surfaces. You can adjust the reflectance property to achieve the desired level of shininess or glossiness.
- Transparency: The transparency property controls the level of transparency or opacity of the material. A value of 0 means the material is completely opaque, while a value of 1 means it is completely transparent. You can set transparency values in between to achieve varying degrees of translucency. This property is useful for creating glass, water, or other translucent materials.
- Glossiness: The glossiness property determines how smooth or rough the surface of the material appears. Higher glossiness values create a smoother and more reflective surface, while lower values result in a rougher appearance. Adjusting the glossiness property can help you achieve different levels of surface smoothness and specular highlights.
- Emission: The emission property allows you to make the material emit light. This property is useful for creating self-illuminating objects or adding glowing effects. You can set the emission color and intensity to control the emitted light’s appearance and strength.
- Normal Map: The normal map property allows you to add depth and surface details to objects. It works by manipulating the way light interacts with the object’s surface normals. Normal maps simulate surface irregularities, such as bumps or grooves, without changing the geometry. This property enhances the visual realism of materials and can be used to create intricate textures and reliefs.
Understanding and manipulating these material properties in Roblox Studio enables you to achieve a wide range of visual effects and create immersive environments in your game. Experiment with different combinations and settings to achieve the desired look and feel for your objects and surfaces, whether you aim for realistic visuals or stylized aesthetics.
Inspirations and ideas for implementing advanced graphics in your own projects
Implementing advanced graphics in your Roblox Studio projects can greatly enhance the visual quality and overall appeal of your game. Here are some inspirations and ideas to help you get started:
- Realistic Environments: Consider creating realistic environments by focusing on details such as lighting, textures, and materials. Use advanced shaders and post-processing effects to achieve realistic lighting and shadows. Implement high-quality textures and material effects to make surfaces look more lifelike. Pay attention to small details like reflections, weather effects, and dynamic lighting changes to create immersive environments.
- Stylized Aesthetics: Explore unique and stylized aesthetics to give your game a distinctive look. Experiment with different art styles, color palettes, and visual effects. Use custom shaders and materials to achieve stylized rendering techniques, such as cel-shading, cartoon-style visuals, or painterly effects. Think outside the box and let your creativity shine through in the visual design of your game.
- Particle Systems: Implement particle systems to add dynamic and visually appealing effects. Particle systems can be used to create realistic fire, smoke, water splashes, sparks, and more. They can also be used for magical effects, explosions, or weather effects like rain or snow. Customize particle properties such as size, color, velocity, and behavior to achieve the desired visual impact.
- Advanced Lighting: Experiment with different lighting techniques to create atmosphere and mood in your game. Utilize dynamic lighting to simulate the passage of time, such as day and night cycles. Implement volumetric lighting effects to create atmospheric scattering and light rays. Consider using global illumination techniques to achieve realistic light bounce and indirect lighting. Play with colored lights, light flickering, or dynamic shadows to add depth and realism to your scenes.
- Depth-of-Field and Focus Effects: Implement depth-of-field and focus effects to draw attention to specific objects or create cinematic visuals. Use depth-of-field to blur the background and create a shallow depth-of-field effect. This technique can be particularly effective for highlighting important objects or creating a sense of depth. Experiment with focus effects, such as bokeh, to add additional visual interest to your scenes.
- Advanced Post-Processing: Utilize advanced post-processing effects to enhance the overall visual quality of your game. Apply effects such as bloom, ambient occlusion, motion blur, color grading, and tonemapping to achieve a more polished and cinematic look. These effects can greatly impact the atmosphere and immersion of your game.
- Custom Shader Effects: Explore the possibilities of custom shader effects by writing your own shader code. Custom shaders allow you to achieve unique visual effects and stylized rendering. You can create effects like distortion, refraction, water ripples, heat haze, or animated textures. Dive into the Roblox Studio Shader Editor and experiment with different shader techniques to push the boundaries of visual fidelity in your game.
Remember, it’s important to strike a balance between advanced graphics and performance optimization. Ensure that your game remains playable on a variety of devices by optimizing your graphics settings, using LOD (level of detail) techniques, and considering the performance impact of each advanced effect you implement.
By drawing inspiration from these ideas and exploring the possibilities within Roblox Studio, you can elevate the visual quality of your game and create captivating and immersive experiences for your players. Don’t be afraid to experiment and let your creativity shine as you implement advanced graphics in your Roblox Studio projects.
Conclusion
Advanced graphics and shaders play a significant role in enhancing the visual quality and overall immersion of games created in Roblox Studio. They allow developers to push the boundaries of creativity and create visually stunning and immersive experiences for players. By utilizing techniques such as texture mapping, custom shaders, post-processing effects, and advanced lighting, developers can elevate the visual fidelity of their games and bring their visions to life.
Advanced graphics and shaders enable the creation of realistic environments, stylized aesthetics, and dynamic effects that captivate players and enhance the overall gameplay experience. From realistic lighting and shadows to stylized rendering techniques, these tools allow developers to craft unique and visually appealing game worlds.
Roblox Studio provides a wide range of features and tools to implement advanced graphics, including the Shader Editor, Material Editor, ParticleEmitter, and various properties to control textures, materials, lighting, and post-processing effects. These resources empower developers to experiment with different visual styles, effects, and rendering techniques to achieve their desired artistic vision.
However, it is essential to strike a balance between visual quality and performance optimization. Careful consideration should be given to device capabilities and the target audience to ensure that the game runs smoothly across a variety of platforms. Optimization techniques such as LOD, performance-friendly shader code, and efficient use of resources should be employed to maintain a smooth and enjoyable gameplay experience.
Overall, advanced graphics and shaders in Roblox Studio offer a world of creative possibilities for developers. They allow for the creation of visually stunning environments, engaging gameplay elements, and captivating experiences for players. By harnessing the power of these tools and pushing the boundaries of visual fidelity, developers can leave a lasting impact and immerse players in their unique game worlds.