
In programming, iteration is the process of repeating a set of instructions multiple times. It allows you to perform a certain action or execute a block of code repeatedly until a specific condition is met. This is where loops come into play.
In Roblox Studio, which is a platform for creating games and experiences, you can use loops to automate tasks and create interactive gameplay elements. There are mainly two types of loops that you can utilize: the “while” loop and the “for” loop.
- While Loop: A while loop executes a block of code as long as a given condition remains true. It consists of a condition and a block of code, and the code block is repeated until the condition evaluates to false. Here’s a basic structure of a while loop in Roblox Studio:
while condition do
    -- Code block to be repeated
end
The condition is evaluated before each iteration. If it is true, the code block is executed, and the loop continues. If the condition becomes false, the loop is exited, and the program continues executing the following instructions.
- For Loop: A for loop is used when you know the number of iterations in advance. It allows you to iterate over a sequence of values, such as a range of numbers. The for loop consists of an initialization, a condition, an increment, and a code block. Here’s an example of a for loop in Roblox Studio:
for variable = startValue, endValue, stepValue do
    -- Code block to be repeated
end
The variable is initialized with the startValue and is incremented by the stepValue on each iteration. The loop continues as long as the variable meets the condition (less than or equal to the endValue). Once the condition becomes false, the loop terminates.
Loops are invaluable in game development as they allow you to create dynamic and interactive experiences. For example, you can use loops to spawn multiple enemies, iterate through a list of items, animate characters, or simulate a countdown timer.
It’s important to be cautious when using loops to prevent infinite loops, where the condition never becomes false, causing your program to hang or crash. To avoid this, ensure that your loop’s condition is eventually satisfied or use additional control statements such as break or return to exit the loop under specific conditions.
By understanding and utilizing iteration and loops effectively in Roblox Studio, you can create more complex and engaging games and experiences with less repetitive code.
Discuss the importance of iteration and loops in game development
Iteration and loops play a crucial role in game development in Roblox Studio. They are essential tools that allow developers to create dynamic, interactive, and engaging gameplay experiences. Here are some key reasons why iteration and loops are important in game development:
- Repetitive Actions: Games often require performing repetitive actions, such as spawning enemies, updating player positions, or checking for collisions. Loops provide a convenient way to automate these tasks by executing a block of code multiple times. Without loops, developers would need to manually repeat the code for each iteration, resulting in lengthy and error-prone code.
- Dynamic Gameplay: Iteration and loops enable developers to create dynamic and evolving gameplay experiences. By iterating over a set of game objects, such as enemies or power-ups, developers can update their positions, states, or behavior on each iteration. This allows for real-time interactions and reactions between game entities, making the gameplay more engaging and immersive.
- Procedural Content Generation: Procedural content generation is a technique widely used in game development to create vast and diverse game worlds. Loops are instrumental in generating content, such as terrain, objects, or levels, based on algorithms or predefined patterns. By using loops, developers can generate complex and varied content efficiently, saving time and effort compared to manually designing each element.
- AI and Enemy Behaviors: Loops are essential for implementing artificial intelligence (AI) and defining enemy behaviors in games. With loops, developers can create AI routines that iterate over a set of actions, decision-making processes, or movement patterns for enemy characters. By utilizing loops, enemy characters can exhibit dynamic and intelligent behaviors, enhancing the challenge and excitement of gameplay.
- Animation and Effects: Loops are vital for creating smooth and continuous animations and effects in games. By iterating over a sequence of frames or steps, developers can animate characters, objects, or visual effects. For example, a loop can cycle through a series of images to create a walking animation or gradually change the color of an object to simulate a fading effect.
- Game Mechanics and Rules: Loops are instrumental in implementing game mechanics and enforcing game rules. For instance, loops can be used to iterate over players to check for specific conditions, such as collecting items, scoring points, or winning conditions. They allow developers to continuously monitor and update the game state based on player actions, ensuring consistent gameplay and enforcing the game’s logic.
In conclusion, iteration and loops are fundamental concepts in game development in Roblox Studio. They provide the means to automate repetitive tasks, create dynamic gameplay experiences, generate procedural content, implement AI behaviors, animate game elements, and enforce game mechanics and rules. By leveraging the power of iteration and loops, developers can create more immersive, interactive, and enjoyable games for players to experience.
Describe the syntax and structure of each loop type
Here’s a breakdown of the syntax and structure of each loop type in Roblox Studio: the while loop and the for loop.
- While Loop: The while loop executes a block of code as long as a given condition remains true. Here’s the syntax and structure of a while loop in Roblox Studio:
while condition do
    -- Code block to be repeated
end
The structure consists of the following elements:
- The keyword “while” indicates the start of the loop.
- The condition is a logical expression that determines whether the loop should continue or not. It is evaluated before each iteration.
- The keyword “do” marks the beginning of the code block to be repeated.
- Inside the loop, you place the code that you want to execute repeatedly.
- The keyword “end” marks the end of the loop.
The code block within the while loop will be executed repeatedly as long as the condition remains true. It’s important to ensure that the condition eventually becomes false; otherwise, you’ll end up with an infinite loop.
- For Loop: The for loop is used when you know the number of iterations in advance or when you want to iterate over a specific sequence of values. Here’s the syntax and structure of a for loop in Roblox Studio:
for variable = startValue, endValue, stepValue do
    -- Code block to be repeated
end
The structure consists of the following elements:
- The keyword “for” indicates the start of the loop.
- The
variableis a counter variable that is initialized with thestartValue. - The
startValuerepresents the initial value of the counter variable. - The
endValuespecifies the end condition for the loop. The loop will continue as long as thevariableis less than or equal to theendValue. - The
stepValuedetermines the increment or decrement applied to thevariableon each iteration. - The keyword “do” marks the beginning of the code block to be repeated.
- Inside the loop, you place the code that you want to execute repeatedly.
- The keyword “end” marks the end of the loop.
The code block within the for loop will be executed repeatedly for each iteration, with the variable being updated according to the specified stepValue. The loop will terminate once the variable exceeds the endValue.
By understanding the syntax and structure of each loop type, you can effectively utilize them in your Roblox Studio projects to automate tasks, create dynamic gameplay, and implement various game mechanics.
Provide examples of how while loops can be used to iterate and repeat actions in game development
Here are a few examples of how while loops can be used to iterate and repeat actions in game development in Roblox Studio:
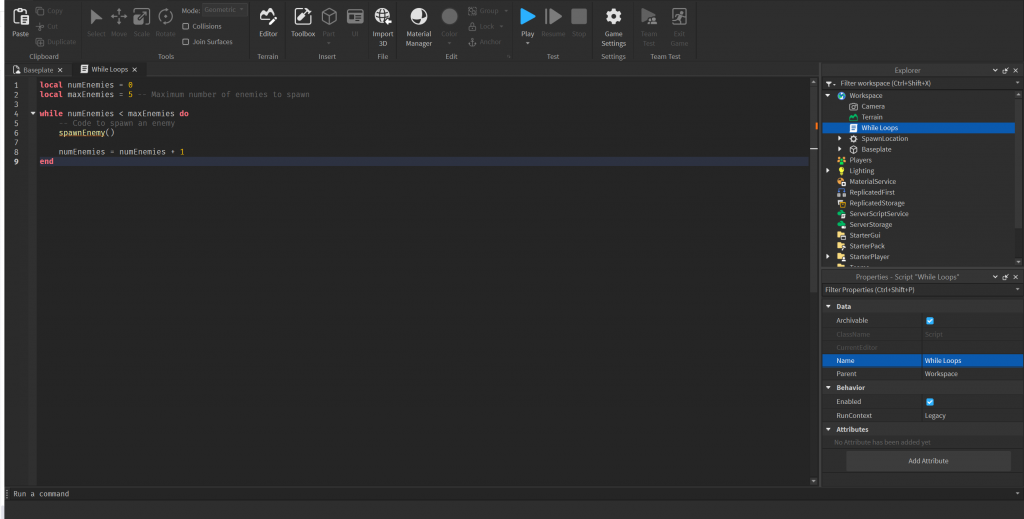
- Spawning Multiple Enemies: Suppose you want to spawn a certain number of enemies in your game. You can use a while loop to repeat the enemy spawning action until the desired number of enemies have been spawned. Here’s an example:
local numEnemies = 0
local maxEnemies = 5 -- Maximum number of enemies to spawn

while numEnemies < maxEnemies do
    -- Code to spawn an enemy
    spawnEnemy()

    numEnemies = numEnemies + 1
end
In this example, the while loop continues to execute the code block (spawnEnemy()) until numEnemies reaches the maxEnemies limit. Each time an enemy is spawned, numEnemies is incremented by 1.
- Countdown Timer: Suppose you want to implement a countdown timer in your game. You can use a while loop to update the timer until it reaches zero. Here’s an example:
local timer = 10 -- Initial timer value

while timer > 0 do
    wait(1) -- Wait for 1 second

    timer = timer - 1
    print("Time remaining:", timer)
end

print("Time's up!")
In this example, the while loop repeatedly subtracts 1 from timer and prints the updated value until it becomes zero. Once the timer reaches zero, the loop terminates, and the “Time’s up!” message is displayed.
- Player Input Validation: Suppose you want to validate player input in your game until a correct input is received. You can use a while loop to keep prompting the player until a valid input is provided. Here’s an example:
local userInput = ""

while userInput ~= "correct" do
    userInput = promptPlayerInput()

    if userInput == "quit" then
        break -- Exit the loop if the player wants to quit
    end

    print("Invalid input. Try again.")
end

print("Congratulations! You entered the correct input.")
In this example, the while loop continuously prompts the player for input until they enter the string “correct.” If the player enters “quit,” the loop is exited using the break statement. Once the correct input is provided, the loop terminates, and a congratulatory message is displayed.
These are just a few examples showcasing how while loops can be used to iterate and repeat actions in game development in Roblox Studio. By leveraging while loops effectively, you can automate tasks, create dynamic gameplay, and validate player input to enhance the overall game experience.
Explain the purpose and functionality of repeat loops
In Roblox, the “repeat” loop is another type of loop that allows you to repeatedly execute a block of code until a specific condition is met. The purpose of the repeat loop is similar to the while loop, but with a slight difference in its execution. Let’s delve into the functionality and usage of the repeat loop in Roblox.
The syntax and structure of a repeat loop in Roblox Studio are as follows:
repeat
    -- Code block to be repeated
until condition
Here’s an explanation of each component:
- The keyword “repeat” marks the beginning of the loop.
- Inside the loop, you place the code block that you want to execute repeatedly.
- The keyword “until” is followed by a condition. The loop will continue executing the code block until the condition evaluates to true.
- The condition is checked after each iteration. If the condition is false, the loop will continue. If the condition becomes true, the loop will terminate, and the program will proceed with the subsequent instructions.
The key distinction between the repeat loop and the while loop is that the repeat loop executes the code block first and then checks the condition. In contrast, the while loop checks the condition first and then executes the code block.
Here’s an example to illustrate the usage of a repeat loop:
local countdown = 5

repeat
    print(countdown)
    wait(1)
    countdown = countdown - 1
until countdown == 0

print("Countdown complete!")
In this example, the repeat loop is used to create a countdown timer. The loop iterates until the “countdown” variable reaches zero. The code block within the loop prints the current value of the countdown, waits for one second, and decrements the countdown by one. Once the countdown reaches zero, the loop terminates, and the message “Countdown complete!” is displayed.
The repeat loop is particularly useful when you want to ensure that the code block executes at least once before checking the condition. It provides a way to structure your code flow and handle scenarios where you need to guarantee the initial execution.
By understanding the purpose and functionality of repeat loops in Roblox, you can leverage them to create dynamic game mechanics, implement countdown timers, validate conditions, and enhance the interactive elements of your Roblox experiences.
Provide examples of how repeat loops can be used to iterate and repeat actions in game development
Here are a few examples of how repeat loops can be used to iterate and repeat actions in game development in Roblox Studio:
- Player Input Validation: Suppose you want to repeatedly prompt the player for input until they enter a valid response. You can use a repeat loop to keep asking for input until the condition is met. Here’s an example:
local userInput = ""

repeat
    userInput = promptPlayerInput()

    if userInput == "quit" then
        break -- Exit the loop if the player wants to quit
    end

    print("Invalid input. Try again.")
until userInput == "correct"

print("Congratulations! You entered the correct input.")
In this example, the repeat loop continues to prompt the player for input until they enter the string “correct.” If the player enters “quit,” the loop is exited using the break statement. Once the correct input is provided, the loop terminates, and a congratulatory message is displayed.
- Random Enemy Spawning: Suppose you want to randomly spawn enemies within a game. You can use a repeat loop to repeatedly spawn enemies until a certain condition is met. Here’s an example:
local numEnemies = 0
local maxEnemies = math.random(5, 10) -- Random number of enemies to spawn (between 5 and 10)

repeat
    -- Code to spawn an enemy
    spawnEnemy()

    numEnemies = numEnemies + 1
until numEnemies >= maxEnemies

print("Enemy spawning complete.")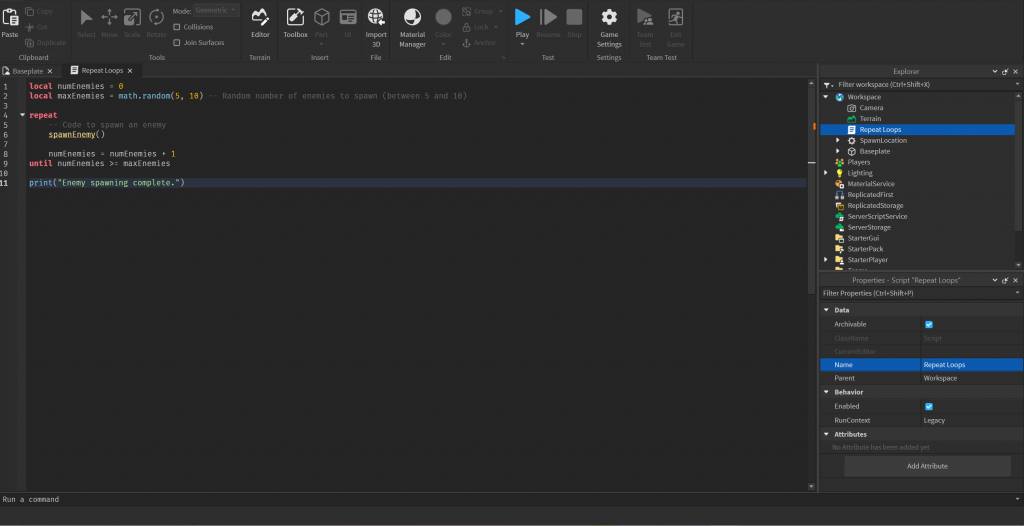
In this example, the repeat loop continues to spawn enemies until the number of spawned enemies (numEnemies) reaches or exceeds the randomly generated maxEnemies value. The loop terminates once the condition is met, and the message “Enemy spawning complete” is displayed.
- Game Simulation: Suppose you want to simulate a game situation or behavior for a certain duration. You can use a repeat loop with a time-based condition to repeat the simulation until the desired time limit is reached. Here’s an example:
local simulationTime = 0
local simulationDuration = 60 -- Duration of the simulation in seconds

repeat
    -- Code to simulate game behavior
    simulateGame()

    wait(1) -- Wait for 1 second
    simulationTime = simulationTime + 1
until simulationTime >= simulationDuration

print("Simulation complete.")
In this example, the repeat loop simulates game behavior by executing the simulateGame() function repeatedly until the simulationTime reaches or exceeds the specified simulationDuration of 60 seconds. The loop terminates once the time limit is reached, and the message “Simulation complete” is displayed.
These examples demonstrate how repeat loops can be used in game development in Roblox Studio to iterate and repeat actions. By leveraging repeat loops effectively, you can create interactive gameplay, validate player input, simulate game situations, and control the flow of your game mechanics.
Discuss loop control statements like “break” and “continue” and how they can be used
Loop control statements, such as “break” and “continue,” are essential tools in programming to control the flow of loops. They allow you to alter the default behavior of loops and provide more flexibility in handling specific conditions. Let’s discuss how these loop control statements can be used in Roblox Studio.
- Break Statement: The “break” statement is used to prematurely exit a loop. When encountered within a loop, the “break” statement immediately terminates the loop, regardless of the loop’s condition. It allows you to break out of the loop and continue with the next instructions outside the loop. Here’s an example:
for i = 1, 10 do
    if i == 5 then
        break -- Exit the loop when i reaches 5
    end

    print(i)
end

print("Loop complete.")
In this example, the “break” statement is used to exit the for loop when the value of i becomes 5. As a result, only the numbers 1, 2, 3, and 4 are printed. After the loop is terminated by the “break” statement, the message “Loop complete” is displayed.
The “break” statement is useful when you need to abruptly exit a loop based on a certain condition, even if the loop’s condition has not been met.
- Continue Statement: The “continue” statement is used to skip the current iteration of a loop and move on to the next iteration. When encountered within a loop, the “continue” statement jumps to the next iteration without executing the remaining code in the loop block. Here’s an example:
for i = 1, 10 do
    if i % 2 == 0 then
        continue -- Skip even numbers
    end

    print(i)
end

print("Loop complete.")
In this example, the “continue” statement is used to skip the even numbers in the for loop. As a result, only the odd numbers (1, 3, 5, 7, 9) are printed, and the even numbers are skipped. After the loop completes, the message “Loop complete” is displayed.
The “continue” statement is useful when you want to skip certain iterations based on specific conditions and continue with the next iteration of the loop.
By utilizing “break” and “continue” statements effectively in Roblox Studio, you can have greater control over the flow of your loops. These statements enable you to exit loops prematurely or skip certain iterations based on conditions, allowing you to create more intricate logic and tailor your loops to specific requirements in your game development projects.
Introduce optimization techniques for improving loop efficiency and performance
Optimizing loop efficiency and performance is crucial in game development to ensure smooth gameplay and optimal resource usage. Here are some techniques you can apply in Roblox Studio to improve loop efficiency:
- Reduce Loop Iterations: One way to optimize loops is by reducing the number of iterations. Analyze the loop’s purpose and conditions to identify if there are any unnecessary or redundant iterations that can be eliminated. By minimizing the loop iterations, you can improve performance. For example, if you know the loop only needs to execute a certain number of times, use a for loop instead of a while loop.
- Move Constant Computations Outside the Loop: If there are computations within the loop that do not change during each iteration, move them outside the loop. By calculating constants or values that do not depend on loop variables beforehand, you avoid unnecessary computations and improve the loop’s efficiency. This can be especially helpful when dealing with complex mathematical calculations or repetitive data retrieval.
- Use Precomputed Lookup Tables: In scenarios where a loop involves repetitive calculations or data retrieval, consider using precomputed lookup tables. Instead of repeatedly performing expensive calculations or accessing external resources within the loop, precompute the values and store them in a table or array before the loop begins. Then, access the precomputed values from the table during the loop iterations. This approach can significantly reduce computation time and improve loop efficiency.
- Utilize Early Exit Conditions: In certain situations, you can optimize loops by introducing early exit conditions. If you have a loop that performs a search or checks conditions, consider adding an exit condition that allows the loop to terminate early once the desired condition is met. This can prevent unnecessary iterations and improve performance. However, be cautious with early exit conditions to ensure they don’t unintentionally disrupt the intended behavior of the loop.
- Use Loop Control Statements Judiciously: As discussed earlier, loop control statements like “break” and “continue” can impact loop performance. While they can be beneficial in certain scenarios, excessive usage of these statements can make code harder to read and maintain. Evaluate your code to determine if the use of loop control statements is necessary or if there are alternative approaches that provide better performance.
- Consider Asynchronous and Parallel Processing: In some cases, loops can be optimized by leveraging asynchronous or parallel processing techniques. Roblox Studio provides functionalities like coroutines, threads, and multi-threading models. By carefully designing your code to take advantage of these features, you can distribute workloads across multiple processes or threads, leading to improved performance and responsiveness.
Remember, optimization should be approached with careful consideration and profiling of your code. Measure the performance impact of your optimizations to ensure they provide the desired improvements without introducing new issues.
Conclusion
Iteration and loops play a vital role in game development in Roblox Studio. They allow developers to repeat actions, automate tasks, and create dynamic gameplay experiences. Whether it’s spawning enemies, implementing countdown timers, validating player input, or simulating game behavior, loops provide the necessary structure to iterate through code blocks multiple times until certain conditions are met.
Roblox Studio offers several loop types, such as the while loop and repeat loop, each with its own syntax and purpose. These loops can be combined with loop control statements like “break” and “continue” to further enhance the control and efficiency of the loops. By utilizing these features effectively, developers can optimize their code, reduce unnecessary iterations, and improve the overall performance of their games.
Furthermore, optimizing loop efficiency is crucial for delivering smooth gameplay experiences. Techniques such as reducing loop iterations, moving constant computations outside the loop, utilizing precomputed lookup tables, employing early exit conditions, using loop control statements judiciously, and considering asynchronous and parallel processing can significantly enhance the performance of loops in Roblox Studio.
In game development, understanding and mastering the concepts of iteration and loops in Roblox Studio empowers developers to create engaging and interactive experiences. By leveraging the power of iteration, developers can bring their game ideas to life, add complexity and dynamism to gameplay, and optimize performance for a seamless player experience.