
Gameplay mechanics play a vital role in game development, especially in the realm of Unity 2D games. They are the core building blocks that shape the player’s experience and determine the overall success and engagement of a game. In Unity 2D, gameplay mechanics refer to the rules, interactions, and systems that define how the game world functions and how the player interacts with it. Let’s explore the importance of gameplay mechanics in Unity 2D game development.
- Player Engagement: Engaging gameplay mechanics are essential for capturing and retaining the player’s attention. Well-designed mechanics create a sense of fun, challenge, and satisfaction, encouraging players to invest their time and energy into the game. Unity 2D provides a versatile framework for implementing various gameplay mechanics, allowing developers to create unique and compelling experiences.
- Immersion and Believability: Gameplay mechanics contribute to the immersion and believability of a game world. They establish rules and logic that players can understand and follow. Unity 2D’s physics engine, animation systems, and scripting capabilities enable developers to create realistic and interactive environments that enhance immersion. Whether it’s a platformer with precise jumping mechanics or a puzzle game with intricate interaction systems, Unity 2D empowers developers to bring their game worlds to life.
- Game Progression and Challenge: Well-designed gameplay mechanics provide a sense of progression and challenge. They introduce new abilities, obstacles, and goals as the player advances through the game. Unity 2D’s flexible development environment allows developers to iterate and fine-tune mechanics to strike the right balance between difficulty and reward. From enemy AI behavior to level design, every aspect of gameplay mechanics can contribute to a satisfying and balanced progression curve.
- Player Agency and Freedom: A successful game gives players a sense of agency and freedom within the game world. Unity 2D offers a wide range of tools and features that enable developers to create mechanics that empower players to make meaningful choices and shape their own experiences. Whether it’s branching storylines, open-world exploration, or character customization, gameplay mechanics provide avenues for player agency and ensure that the game feels responsive to their actions.
- Replayability and Longevity: Gameplay mechanics are crucial for the replayability and longevity of a game. When mechanics are well-designed, they can create a compelling gameplay loop that keeps players coming back for more. Unity 2D’s scripting capabilities allow developers to design mechanics that offer depth and complexity, providing layers of strategy and mastery. The ability to add new mechanics, tweak existing ones, and create expansions or updates ensures that the game remains fresh and engaging over time.
In conclusion, gameplay mechanics are the backbone of any successful Unity 2D game. They shape the player’s experience, drive engagement, and contribute to the overall quality and longevity of the game. With Unity’s powerful development environment, developers have the tools and flexibility to design and implement gameplay mechanics that captivate players and deliver unforgettable gaming experiences.
Player Movement Mechanics
Player movement mechanics are an essential aspect of Unity 2D game development. They determine how players navigate and interact with the game world, playing a crucial role in the overall gameplay experience. Whether it’s a platformer, adventure game, or top-down shooter, well-designed player movement mechanics can greatly enhance player engagement and enjoyment. Let’s explore the key elements and considerations when implementing player movement mechanics in Unity 2D.
- Character Controller: The character controller is the foundation of player movement mechanics in Unity 2D. It is responsible for handling input, collision detection, and applying movement forces to the player character. Unity provides built-in components like Rigidbody2D and CharacterController, which offer different approaches to character movement. Rigidbody2D provides physics-based movement with features such as gravity, friction, and velocity, while CharacterController offers more direct control over character movement by handling collisions and groundedness.
- Input Handling: Accurate and responsive input handling is crucial for smooth player movement. Unity 2D provides various input options, including keyboard, mouse, touch, and gamepad controls. By utilizing the Input system or third-party input managers, developers can capture and process player input effectively. Consideration should be given to input buffering, dead zones, sensitivity settings, and input remapping to accommodate different player preferences and devices.
- Basic Movement Actions: The fundamental movement actions, such as walking, running, jumping, and crouching, shape the player’s mobility within the game world. Implementing these actions involves manipulating the character’s position, velocity, and acceleration. Unity 2D’s physics engine or custom movement calculations can be used to achieve the desired movement behavior. It is essential to fine-tune parameters like speed, acceleration, and jump height to strike the right balance between responsiveness and realism.
- Advanced Movement Techniques: Depending on the game genre and mechanics, additional movement techniques can be introduced to enhance player abilities and gameplay depth. Examples include double jumping, wall jumping, sliding, climbing, grappling, or dashing. These techniques often require more complex logic and may involve raycasting, collision detection, or state machines to handle various movement states. Unity 2D’s physics and collision detection systems, coupled with custom scripting, enable the implementation of these advanced movement mechanics.
- Animation and Visual Feedback: Visual feedback through animations and effects is crucial for conveying a sense of weight, momentum, and responsiveness in player movement. Unity’s animation system allows developers to create and blend animations seamlessly. Animations can be triggered based on movement states, speed, input, or environmental interactions. Additionally, particle effects, camera shake, and sound effects can be used to further enhance the visual and auditory feedback, making the player movement feel satisfying and immersive.
- Testing and Iteration: Player movement mechanics should undergo rigorous testing and iteration to ensure a smooth and enjoyable experience. It’s important to playtest the game, gather feedback, and make adjustments based on player input. Balancing factors like movement speed, acceleration, and collision detection can greatly impact the feel and responsiveness of the controls. Regular iteration and refinement are necessary to fine-tune the player movement mechanics and achieve the desired gameplay experience.
In conclusion, player movement mechanics are a vital component of Unity 2D game development. By focusing on character controllers, input handling, basic and advanced movement actions, animation feedback, and thorough testing, developers can create engaging and intuitive movement systems that enhance player immersion and enjoyment. Careful attention to detail and iteration during the implementation process can result in fluid and satisfying player movement that contributes to the overall success of the game.
Implementing basic movement
mplementing basic movement in a Unity 2D game involves setting up player controls and manipulating the player character’s position, velocity, and animations. Here’s a step-by-step guide on how to implement basic movement in Unity 2D:
- Create a Player Character: Start by creating a 2D sprite or importing a character sprite into your Unity project. Attach a Rigidbody2D component to the character to handle physics-based movement.
- Input Handling: Set up input handling to capture player controls. Unity’s Input system provides a convenient way to manage input. You can use the Input.GetAxis function to get horizontal and vertical input values, or use the Input.GetKey function to detect specific key presses.
- Movement Script: Create a new C# script to handle the player’s movement. Attach the script to the player character’s GameObject. In the script, you’ll need to access the Rigidbody2D component and modify its velocity based on the input values.
using UnityEngine;

public class PlayerMovement : MonoBehaviour
{
    public float moveSpeed = 5f;
    private Rigidbody2D rb;

    private void Start()
    {
        rb = GetComponent<Rigidbody2D>();
    }

    private void Update()
    {
        float moveHorizontal = Input.GetAxis("Horizontal");
        float moveVertical = Input.GetAxis("Vertical");

        Vector2 movement = new Vector2(moveHorizontal, moveVertical);
        rb.velocity = movement * moveSpeed;
    }
}
In this example script, the “moveSpeed” variable determines the player’s movement speed. The Update method retrieves the input values, creates a movement vector, and sets the Rigidbody2D’s velocity accordingly.
- Apply the Script: Attach the PlayerMovement script to the player character’s GameObject in the Unity Editor. Adjust the “moveSpeed” value to your desired speed.
- Testing: Run the game and test the player movement. The character should move in response to the arrow keys or other configured input. Make adjustments to the movement speed or input settings as needed.
- Animation Feedback (Optional): To add visual feedback to the player’s movement, you can create animations for walking, running, or idle states. Use Unity’s Animation system to animate the player sprite based on the movement input. For example, you can trigger a walking animation when the player moves horizontally.
private Animator animator;

private void Start()
{
    rb = GetComponent<Rigidbody2D>();
    animator = GetComponent<Animator>();
}

private void Update()
{
    // ...existing code...

    // Set animator parameter based on movement
    animator.SetFloat("Speed", Mathf.Abs(moveHorizontal));
}
In this example, an Animator component is attached to the player character. The animator parameter “Speed” is set based on the horizontal movement input, which triggers the appropriate animation.
- Iteration and Refinement: Test the game and iterate on the movement mechanics to achieve the desired feel and responsiveness. Adjust parameters like moveSpeed, acceleration, and friction to fine-tune the movement controls.
By following these steps, you can implement basic movement in a Unity 2D game. Remember to consider additional features like jumping, crouching, or collision handling based on your game’s requirements.
Adding animation to player movement
Adding animation to player movement in Unity 3D can greatly enhance the visual appeal and immersion of a game. By syncing character animations with the player’s movement, you can bring the character to life and make the movement feel more natural. Here’s a step-by-step guide on how to add animation to player movement in Unity 3D:
- Create a Player Character: Start by creating or importing a 3D character model into your Unity project. Make sure the character model has an armature (skeleton) and animations associated with it. If you don’t have a character model, you can find free or paid assets on the Unity Asset Store or other online resources.
- Set up Animator Controller: Create an Animator Controller asset in Unity. This controller manages the transitions between different animations based on conditions. To create the Animator Controller, right-click in the Project window, go to Create > Animator Controller. Give it a name, such as “PlayerAnimatorController”.
- Create Animation States: Open the Animator window by double-clicking the Animator Controller asset. In the Animator window, you’ll see a default “Entry” state. Right-click in the Animator window, and select “Create State > Empty”. This will create a new state. Rename the state, such as “Idle”. Repeat this process to create states for other animations, such as “Walk”, “Run”, “Jump”, etc.
- Set Animation Transitions: Connect the states in the Animator window to create transitions. Click and drag from one state to another to create a transition. Adjust the transition conditions and parameters to control when each animation should play. For example, you can set a condition to play the “Walk” animation when the player’s movement speed exceeds a certain threshold.
- Set Up Parameters: Define parameters in the Animator Controller that can control the transitions between animations. To add parameters, select the Animator Controller asset and go to the Inspector window. Click the “+” button in the Parameters section to add parameters like “Speed” or “IsJumping”. These parameters can be accessed and modified from the script to control the animations.
- Add Animator Component: Attach an Animator component to the player character’s GameObject. Select the player character in the Unity Editor, go to the Inspector window, click “Add Component”, and search for “Animator”. Assign the Animator Controller asset to the Animator component’s Controller field.
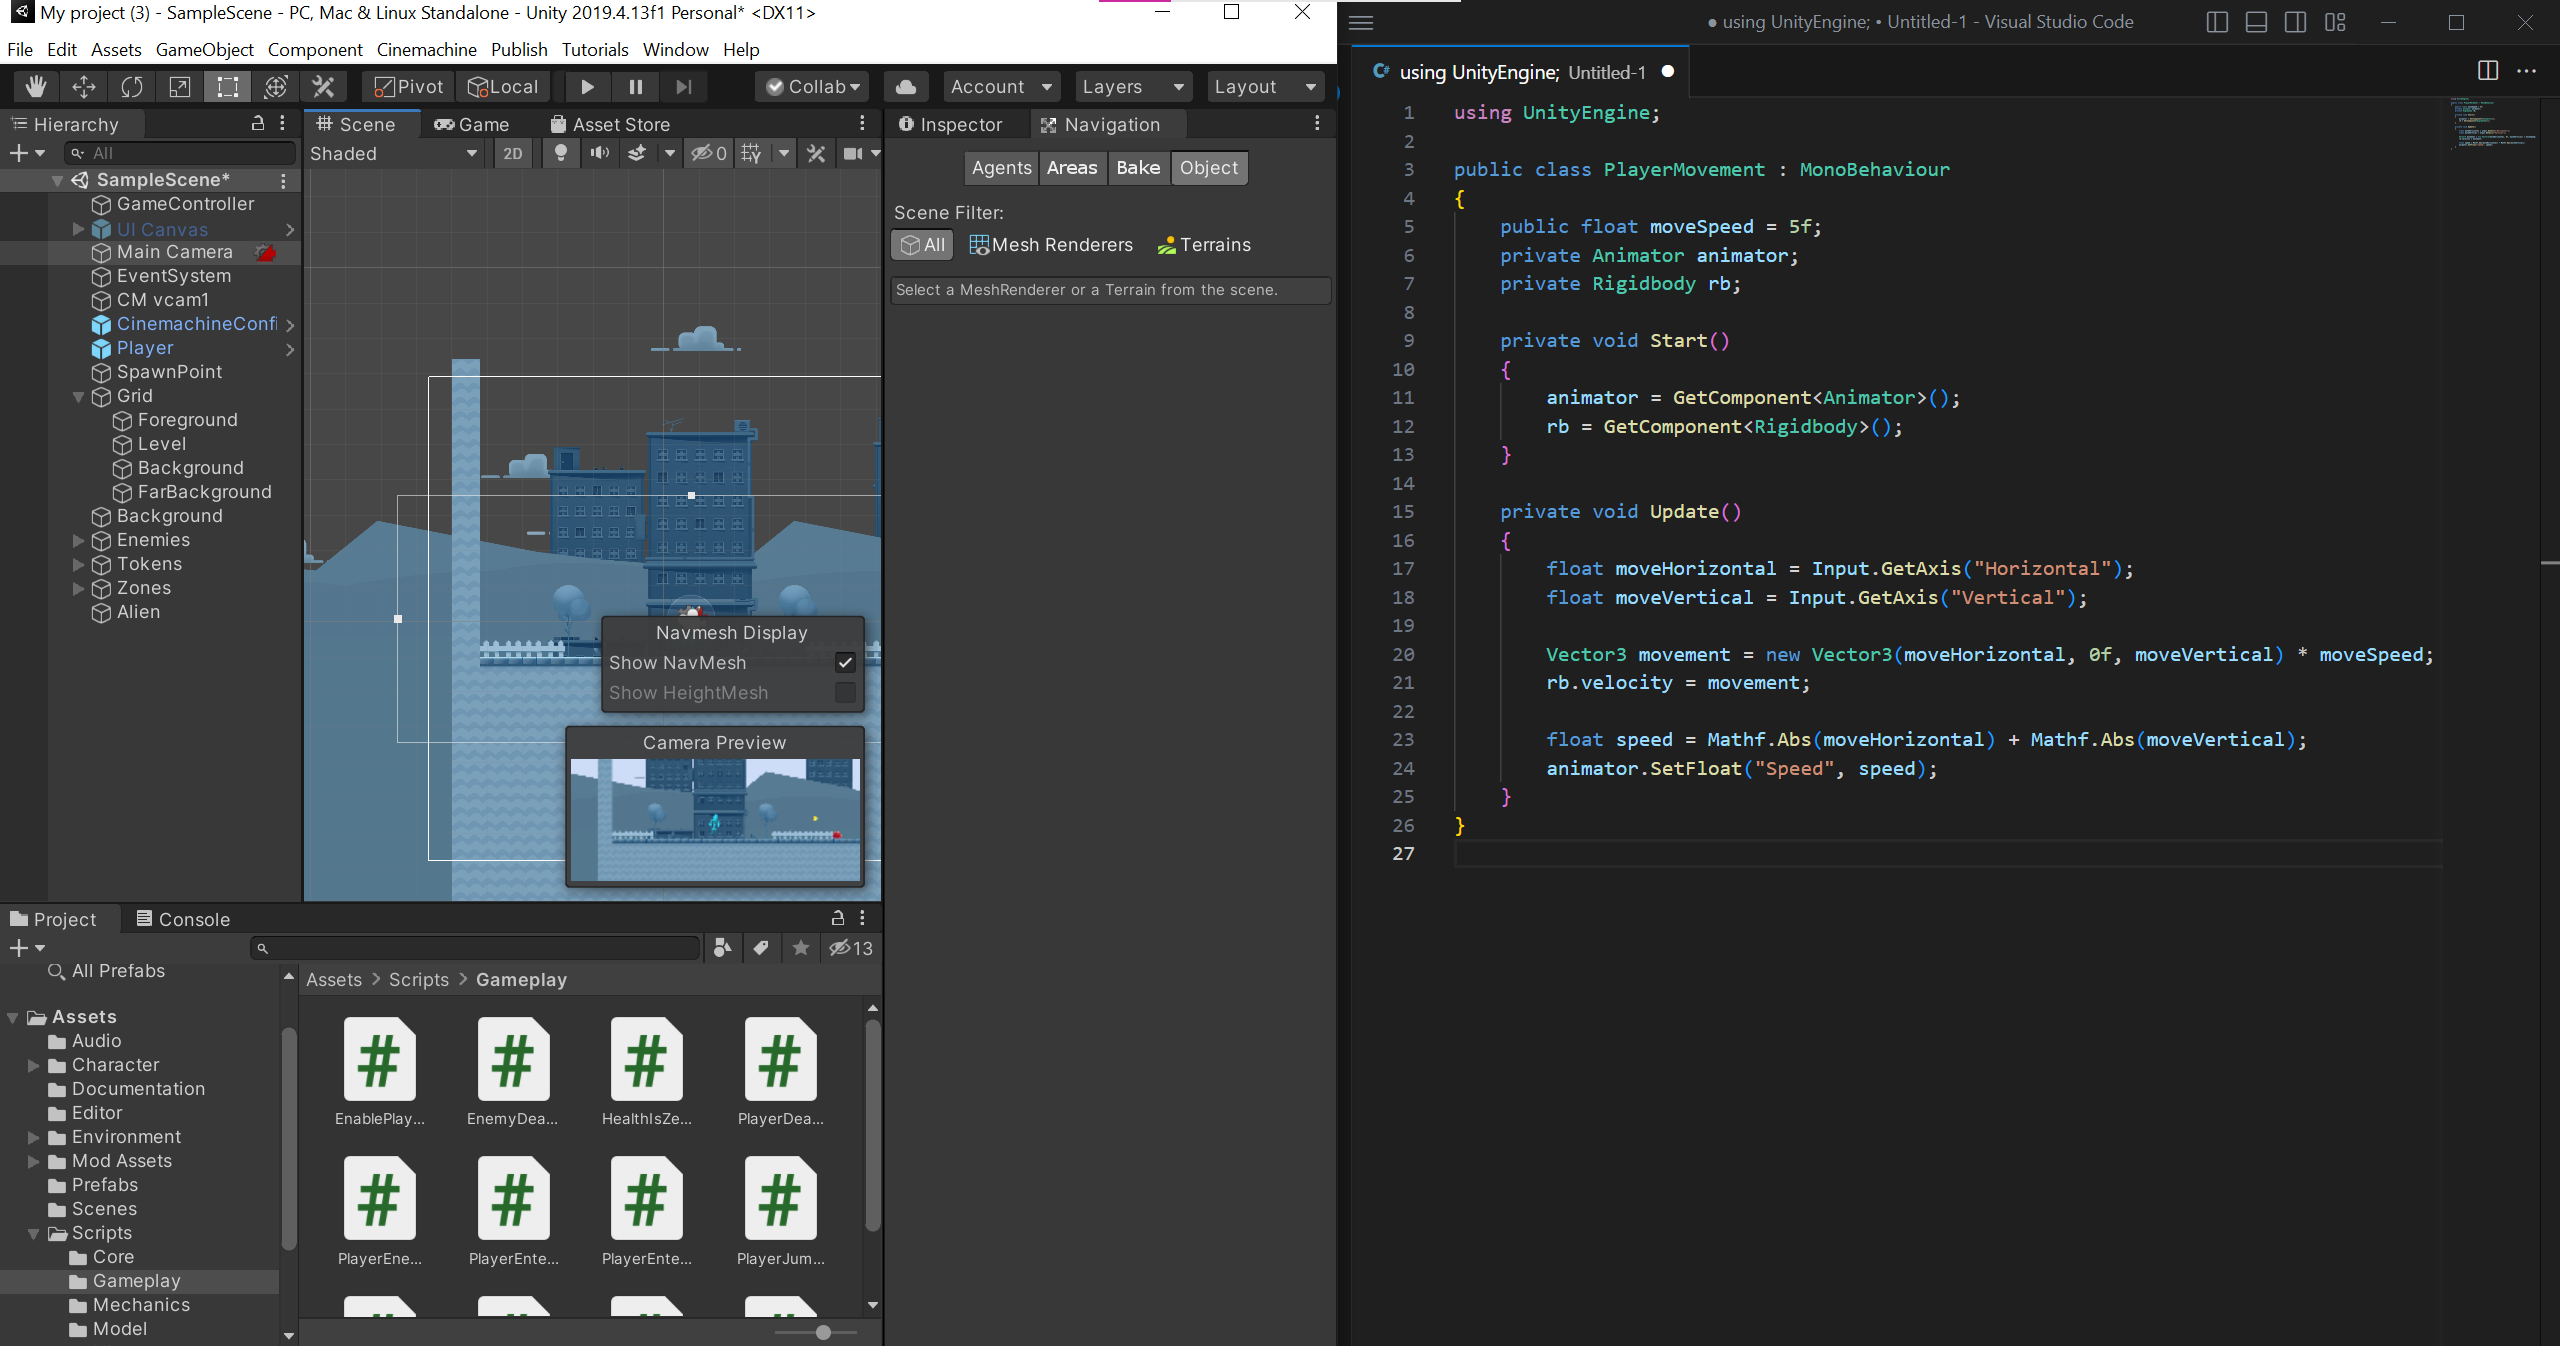
- Scripting: Create a C# script to control the player’s movement and modify the Animator component’s parameters accordingly. This script will be responsible for updating the “Speed” parameter based on the player’s movement speed. For example:
using UnityEngine;

public class PlayerMovement : MonoBehaviour
{
    public float moveSpeed = 5f;
    private Animator animator;
    private Rigidbody rb;

    private void Start()
    {
        animator = GetComponent<Animator>();
        rb = GetComponent<Rigidbody>();
    }

    private void Update()
    {
        float moveHorizontal = Input.GetAxis("Horizontal");
        float moveVertical = Input.GetAxis("Vertical");

        Vector3 movement = new Vector3(moveHorizontal, 0f, moveVertical) * moveSpeed;
        rb.velocity = movement;

        float speed = Mathf.Abs(moveHorizontal) + Mathf.Abs(moveVertical);
        animator.SetFloat("Speed", speed);
    }
}
In this example script, the “moveSpeed” variable determines the player’s movement speed. The Update method retrieves the input values, applies movement to the Rigidbody component, and sets the “Speed” parameter in the Animator component.
- Assign Animation Clips: Drag and drop the animation clips onto the respective animation states in the Animator window. Ensure that each animation clip corresponds to the desired movement, such as walking, running, jumping, etc.
- Testing: Run the game and test the player movement. The character should now play animations based on the player’s movement input. Make adjustments to animation transitions, speed thresholds, or other parameters to achieve the desired visual effect.
By following these steps, you can add animation to player movement in Unity 3D. Remember to consider additional features like blending animations, handling transitions between different states, and adding other animations like crouching or attacking based on your game’s requirements.
Environmental Interaction Mechanics
Environmental interaction mechanics play a crucial role in creating dynamic and engaging gameplay experiences in Unity 2D. These mechanics allow players to interact with and affect the game world, enabling them to solve puzzles, discover secrets, overcome obstacles, and advance through the game. Here’s an overview of how to implement environmental interaction mechanics in Unity 2D:
- Object Interaction: Define objects in the game world that players can interact with. These objects can include doors, switches, buttons, levers, crates, keys, and more. Each object should have a specific purpose or behavior tied to it. For example, a switch might activate a bridge, or a key might unlock a door.
- Collision Detection: Use Unity’s collision detection system to detect when the player comes into contact with an interactable object. Attach a collider component to both the player character and the interactable objects. When they collide, you can trigger specific interactions or events.
- Input Handling: Implement input handling to allow players to initiate interactions. Capture input from the player, such as pressing a key or clicking on an object, to determine when they want to interact with an object in the game world.
- Scripting Interactions: Create scripts to define the behavior and functionality of each interactable object. Attach these scripts to the respective objects in the Unity Editor. The scripts should include logic for handling player input, triggering events, and modifying the game world accordingly. For example, a script might control a door’s opening and closing animation or activate a platform when a button is pressed.
- Feedback and Visual Cues: Provide visual and auditory feedback to indicate successful interactions. This feedback can include animations, particle effects, sound effects, or UI elements. Visual cues, such as highlighting interactive objects when the player is nearby or changing the cursor when hovering over an interactable object, can also enhance the player’s understanding of available interactions.
- Puzzle Design: Environmental interaction mechanics are often utilized in puzzle design. Create puzzles that require players to interact with objects in a specific sequence or combination to progress. Consider logical challenges, spatial reasoning, and hidden clues to make the puzzles engaging and rewarding to solve.
- Iteration and Testing: Test and iterate on your environmental interaction mechanics to ensure they are intuitive and enjoyable for players. Get feedback from playtesters and make adjustments based on their experiences. Balance the difficulty and complexity of interactions to maintain a satisfying gameplay flow.
- Expand Mechanics: Consider expanding your environmental interaction mechanics by introducing additional elements such as physics-based interactions, destructible objects, interactive NPCs, or interactive dialogues. These additions can further enrich the gameplay experience and offer more opportunities for player engagement.
Remember to keep the player’s experience in mind when designing environmental interaction mechanics. Strive to create meaningful interactions that provide a sense of agency, discovery, and progress. With Unity 2D’s flexibility and scripting capabilities, you have the tools to implement diverse and engaging environmental interaction mechanics that elevate your game’s overall immersion and enjoyment.
Level Design and Progression
Level design and progression are crucial elements in creating engaging and rewarding gameplay experiences in Unity 2D. Well-designed levels not only provide challenges for players but also guide them through the game’s narrative and mechanics. Here’s an overview of how to approach level design and progression in Unity 2D:
- Define the Game’s Objectives: Start by defining the objectives and goals of your game. Determine what the player needs to accomplish in each level or stage. This could include reaching a specific location, defeating enemies, collecting items, solving puzzles, or completing specific tasks. Clear objectives help guide the level design process.
- Plan the Level Layout: Sketch out the overall layout and structure of each level. Consider factors such as the size of the level, the placement of obstacles, platforms, and interactive objects. Create a rough outline of the progression path, including any branching paths or optional areas. This planning stage provides a high-level view of how the level will be organized.
- Introduce Mechanics and Challenges: Introduce new gameplay mechanics, obstacles, and challenges gradually to allow players to learn and adapt. Start with simple mechanics in early levels and gradually introduce more complex mechanics as the player progresses. Each level should present new challenges and opportunities for players to apply their skills.
- Create Visual Variety: Vary the visual elements and themes throughout the levels to maintain player interest. Use different tilesets, backgrounds, colors, lighting, and props to create a visually appealing and diverse game world. Visual variety can also be used to differentiate between different levels or areas within the game.
- Balance Difficulty: Strive for a balanced difficulty curve to keep players engaged and motivated. Start with easier levels to introduce core mechanics and gradually increase the challenge as the player progresses. Avoid sudden spikes in difficulty that may frustrate or discourage players. Provide a sense of accomplishment and reward for overcoming challenging obstacles.
- Player Feedback and Progression Indicators: Provide clear feedback to the player about their progress and achievements. Use visual and auditory cues to indicate when the player completes objectives, collects items, or unlocks new areas. Progression indicators such as level names, numbers, or maps can help players navigate through the game and understand their overall progression.
- Hidden Secrets and Rewards: Consider incorporating hidden secrets or rewards within levels to encourage exploration and reward curious players. Hidden areas, collectibles, or bonus challenges can provide additional gameplay depth and replay value. These hidden elements can also tie into the game’s narrative or offer special abilities or power-ups.
- Playtesting and Iteration: Regular playtesting is essential for refining and improving the level design and progression. Observe how players navigate through the levels, gather feedback, and make adjustments based on their experiences. Iteration is key to fine-tune the difficulty, pacing, and overall flow of the game.
- Level Completion and Unlocking: Determine the criteria for level completion and how levels unlock or progress. This could involve achieving specific objectives, reaching a certain score, collecting a certain number of items, or defeating a boss. Clearly communicate to the player when a level is complete and how they can access new levels or areas.
- Level Editor and Tools: Utilize Unity’s level editor and tools to streamline the level design process. Unity’s built-in tilemap editor, physics system, and scripting capabilities make it easier to create and iterate on levels. Additionally, consider using asset packs or creating reusable level components to speed up level creation and maintain consistency.
By considering these aspects and following a systematic approach to level design and progression, you can create engaging and well-paced gameplay experiences in Unity 2D. Iteration, testing, and player feedback are essential for refining your levels and ensuring an enjoyable and satisfying player journey throughout your game.
Designing the user interface elements (UI)
Designing user interface (UI) elements in Unity 2D is an important aspect of creating an intuitive and visually appealing game. The UI provides players with important information, navigation options, and interactive elements. Here’s a guide on how to design UI elements such as menus, buttons, and more in Unity 2D:
- Planning and Sketching: Start by planning the layout and functionality of your UI elements. Consider the purpose of each element and how they contribute to the overall user experience. Sketch out rough designs on paper or use digital design tools to visualize the placement and arrangement of UI elements.
- Canvas Setup: Create a Canvas object in Unity. The Canvas acts as a container for UI elements and provides the foundation for positioning and scaling them. Choose the appropriate Render Mode for your game, such as Screen Space – Overlay, Screen Space – Camera, or World Space, depending on your requirements.
- Creating UI Elements: Unity provides various UI elements that you can utilize, such as panels, buttons, text elements, sliders, images, and more. To create UI elements, right-click in the Hierarchy window, go to UI, and select the desired element type. Adjust the size, position, and appearance of the elements in the Scene or Rect Transform component.
- Styling and Visual Design: Consider the visual design of your UI elements to ensure they match the theme and style of your game. Customize colors, fonts, and textures to create a cohesive and visually appealing UI. Unity’s Image and Text components allow you to modify visual properties, such as color, font size, and alignment.
- Interaction and Event Handling: Assign event handlers and scripts to UI elements to handle player interactions. Unity’s EventSystem and EventTrigger components facilitate detecting input events like button clicks or mouse hover. Attach scripts to handle these events and define the corresponding behavior, such as opening menus, triggering actions, or transitioning between scenes.
- Layout and Anchoring: Use Unity’s layout and anchoring system to ensure your UI elements adapt to different screen sizes and resolutions. Unity provides layout components like HorizontalLayoutGroup and VerticalLayoutGroup to control the arrangement and resizing of UI elements. Anchoring elements to specific corners, edges, or centers allows them to maintain their relative positions as the screen size changes.
- Localization and Text Localization: If your game supports multiple languages, consider implementing localization for your UI elements. Unity’s Localization Package can help you manage translations and dynamically update text elements based on the player’s language preferences.
- Testing and Iteration: Regularly test your UI elements to ensure they function correctly and provide a smooth user experience. Evaluate the readability, responsiveness, and overall usability of your UI. Collect feedback from players and make iterative improvements based on their suggestions.
- Audio and Feedback: Consider adding audio cues and feedback to enhance the user experience. Attach sound effects or background music to UI elements to provide auditory feedback during interactions. Animations, transitions, and visual effects can also make the UI more engaging and responsive.
- Mobile and Touch Input: If you’re targeting mobile devices, optimize your UI elements for touch input. Ensure that buttons and interactive elements have sufficient size and spacing to accommodate finger touches. Test your UI on different mobile devices to ensure compatibility and usability.
Remember, UI design is an iterative process. Continuously gather player feedback, make refinements, and test your UI elements to provide the best possible user experience. With Unity’s built-in UI tools and flexibility, you have the resources to create visually appealing, functional, and user-friendly UI elements for your 2D game.
Implementing UI functionality
Implementing UI functionality in Unity 2D is essential for creating a polished and immersive game experience. UI elements like start screens, game over screens, and in-game menus provide players with important information and allow them to navigate through different game states. Here’s a step-by-step guide on how to implement UI functionality in Unity 2D:
- Create UI Canvas: Start by creating a UI Canvas in Unity. Right-click in the Hierarchy window, go to UI, and select “Canvas”. The Canvas acts as a container for your UI elements and is essential for positioning and scaling them.
- Design UI Elements: Design the UI elements required for different game states. These can include start screens, game over screens, in-game menus, health bars, score displays, and more. Use Unity’s UI components, such as panels, buttons, text elements, and images, to create your desired UI layout.
- Scene Management: Set up your scene management system to handle different game states. Unity’s SceneManager class allows you to load and unload scenes during gameplay. Create separate scenes for the start screen, main game scene, and game over screen.
- Scene Transition: Define the transitions between different game states. For example, when the game starts, transition from the start screen to the main game scene. Use Unity’s SceneManager.LoadScene() function to load the appropriate scene based on player interactions or game events.
- UI Scripts and Components: Attach scripts and components to your UI elements to control their functionality. For example, attach a script to a button to handle its onClick event. Unity’s EventSystem and EventTrigger components allow you to detect and handle user interactions, such as button clicks or mouse hover events.
- Data Management: Set up a data management system to track and manage important game data, such as scores, player health, or game progress. Create appropriate data structures or scriptable objects to store and update this information. Use these data to update UI elements like score displays or health bars.
- Game Over and Restart: Implement the functionality for game over screens and restarting the game. When the game ends, transition to the game over screen and display relevant information, such as the final score. Provide options for players to restart the game or return to the start screen. You can use Unity’s SceneManager.LoadScene() function to reload the main game scene or return to the start screen scene.
- Pause Menu and In-Game Menus: Implement in-game menus, such as pause menus or options menus, to provide players with control over game settings or to pause/resume gameplay. Create UI elements for the menus and attach scripts to handle their functionality. Pause the game when the pause menu is opened and resume gameplay when the menu is closed.
- Audio and Visual Feedback: Enhance the UI functionality with audio and visual feedback. Add sound effects or background music to UI interactions to provide auditory cues. Implement animations, transitions, or visual effects to make the UI elements more engaging and responsive.
- Testing and Iteration: Test your UI functionality thoroughly to ensure smooth transitions, accurate data updates, and responsive interactions. Gather feedback from players and make necessary iterations to improve the usability and user experience of your UI elements.
By following these steps, you can successfully implement UI functionality for different game states in Unity 2D. A well-designed and functional UI enhances player engagement, provides important information, and contributes to an immersive gameplay experience.
Testing and Iteration
Testing and iteration are crucial steps in the development process of a Unity 2D game. Through testing, you can identify and address issues, refine gameplay mechanics, and improve the overall player experience. Here’s a guide on how to effectively test and iterate your Unity 2D game:
- Define Test Objectives: Start by defining clear objectives for your testing phase. Identify what aspects of the game you want to evaluate, such as gameplay mechanics, level design, UI functionality, performance, or bugs. Establishing clear objectives helps focus your testing efforts and ensures you cover all essential areas.
- Create Test Plans: Develop test plans that outline the specific tests you’ll conduct. Break down your game into different components or features and create test cases for each. Define the expected outcomes and criteria for success. This structured approach will help you maintain organization and track your progress during testing.
- Manual Testing: Begin by performing manual testing, where you play through the game and actively look for issues or inconsistencies. Test different gameplay scenarios, interact with UI elements, and explore various paths and options. Pay attention to gameplay balance, level difficulty, responsiveness of controls, and any visual or audio issues. Take notes and document any bugs or areas that need improvement.
- Bug Tracking and Reporting: Utilize bug tracking tools or spreadsheets to track and report issues encountered during testing. Assign a severity level to each bug based on its impact on gameplay or functionality. Include detailed steps to reproduce the bug, system information, and any relevant screenshots or videos. This information will assist developers in understanding and fixing the issues.
- Performance Testing: Assess the performance of your game to ensure smooth gameplay. Test on different devices and platforms, especially the target platforms for your game. Monitor frame rate, loading times, memory usage, and any performance bottlenecks. Optimize your game by addressing performance issues and ensuring it runs well within the desired specifications.
- User Experience Testing: Obtain feedback from playtesters to gather insights on the player experience. Observe how players interact with your game, record their actions, and encourage them to provide feedback. Analyze their feedback and identify areas where the game may be confusing, frustrating, or lacking engagement. Use this feedback to make iterative improvements to your game design and mechanics.
- Iteration and Feedback Loop: Based on the findings from testing and user feedback, prioritize the identified issues and make necessary improvements. Iteratively implement changes, addressing bugs, improving gameplay mechanics, refining level design, and enhancing the overall user experience. Test the updated version again to ensure the changes have been effective and have not introduced new issues.
- Automated Testing: Consider implementing automated testing where applicable. Create test scripts or use Unity testing frameworks to automate repetitive or time-consuming tests. Automated tests can help validate game logic, AI behavior, or UI functionality. They can also be useful for regression testing, ensuring that previously resolved issues do not resurface.
- Continuous Testing: Perform regular testing throughout the development process, not just at the end. Continuous testing allows you to catch issues early on, iterate faster, and maintain a stable and polished game. Regularly review and update your test plans to align with the latest changes in the game.
- External Testing and Feedback: Seek feedback from external sources, such as beta testers or focus groups, to gain fresh perspectives and identify any issues missed during internal testing. External testers can provide valuable insights and uncover usability or gameplay issues that you may have overlooked.
Remember that testing and iteration are iterative processes. Regularly repeat the testing cycle as you make changes and improvements. Strive for thorough testing, collect feedback, and iterate on your game to ensure a high-quality and enjoyable player experience in your Unity 2D game.
Conclusion
Implementing gameplay mechanics in Unity 2D is a fundamental aspect of game development that greatly contributes to the overall player experience. By carefully designing and implementing mechanics, you can create engaging, interactive, and enjoyable gameplay that keeps players immersed and entertained.
Unity 2D provides a robust framework and a wide range of tools and features that empower developers to bring their gameplay ideas to life. From player movement mechanics to environmental interaction and level design, Unity 2D offers the flexibility and versatility needed to create diverse and captivating gameplay experiences.
When implementing gameplay mechanics in Unity 2D, it is crucial to consider factors such as player feedback, balancing difficulty, and ensuring smooth and responsive controls. Playtesting and iteration play a vital role in refining and fine-tuning the mechanics to create a polished and enjoyable gameplay experience.
Furthermore, the use of animations, sound effects, and visual feedback enhances the immersion and engagement of players. These elements bring life to the gameplay and help communicate important information and events to the player.
The implementation of gameplay mechanics in Unity 2D is a creative and iterative process that requires careful planning, testing, and iteration. It involves understanding the game’s objectives, designing levels and challenges, and incorporating player feedback to continuously improve the gameplay experience.
With Unity 2D’s powerful development environment and a community of developers, resources, and tutorials, you have access to the necessary tools and support to implement engaging gameplay mechanics and create memorable gaming experiences.
Ultimately, the success of implementing gameplay mechanics in Unity 2D lies in the ability to strike a balance between fun, challenge, and player satisfaction. By focusing on creating mechanics that are intuitive, rewarding, and well-integrated with the game’s overall design, you can captivate players and deliver a compelling gameplay experience in your Unity 2D game.