
This guide will provide an introduction to creating basic 3D objects in Blender, helping you take your first steps into the exciting realm of 3D modeling. Before diving into intricate designs and animations, it’s crucial to understand the fundamental concepts and tools Blender offers.
Getting Started: Interface Overview
Blender’s interface may seem overwhelming at first, but breaking it down into key components makes it more manageable. The primary areas include the 3D view, where your objects exist, the toolbar for accessing various tools, and the properties panel for adjusting object parameters.
- 3D View: This is your canvas. Here, you can navigate, manipulate, and visualize your 3D scene. Familiarize yourself with basic controls like rotating, panning, and zooming to navigate the workspace effectively.
- Toolbar: The toolbar is home to a plethora of tools that allow you to create, edit, and transform objects. Understanding the purpose of each tool is essential for efficient modeling.
- Properties Panel: This panel provides detailed settings for selected objects. Depending on what you’re working on, these settings may include dimensions, materials, and modifiers.
Creating a Cube
Step 1: Open Blender and Set Up Your Workspace
Ensure you have Blender installed on your system. Upon opening Blender, you’ll be greeted by the default workspace. Familiarize yourself with the essential components like the 3D view, toolbar, and properties panel.
Step 2: Navigate to the 3D View
The 3D view is where you’ll interact with and visualize your objects. Click on it to make sure it’s active.
Step 3: Add a Cube
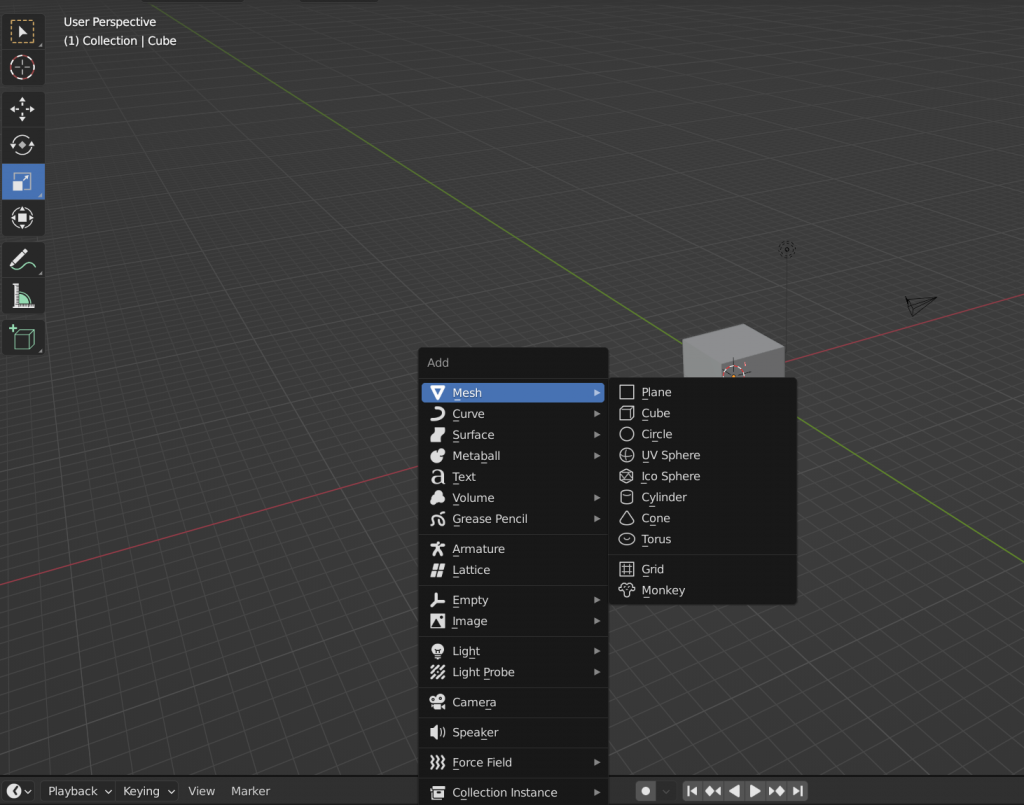
Blender provides a convenient shortcut to add objects. Press Shift + A to open the Add menu. Hover your mouse over “Mesh” in the menu, and a submenu will appear. Select “Cube” from the options.
Alternatively, you can use the top menu. Click on “Add” and choose “Mesh,” then select “Cube.”
Upon adding the cube, it will appear in the center of your 3D view.
Step 4: Manipulate the Cube
Now that you have a cube in your scene, you can manipulate its size, position, and rotation.
- To scale the cube, press
Sand move your mouse. Left-click to confirm the scale. - To rotate the cube, press
Rand move your mouse. Left-click to confirm the rotation. - To move the cube, press
Gand move your mouse. Left-click to confirm the new position.
Experiment with these basic transformations to get a feel for how you can control and shape your objects.
Step 5: Adjust Cube Properties (Optional)
In the properties panel on the right side of the screen, you can adjust various properties of the selected object. This includes dimensions, location, and other parameters. Take some time to explore these settings and see how they affect your cube.
Duplicating and Deleting Objects
Efficiently managing objects in Blender is essential for any 3D artist. Whether you’re replicating elements or cleaning up your scene, knowing how to duplicate and delete objects is fundamental. In this guide, we’ll explore the straightforward process of duplicating and deleting objects in Blender.
Duplicating Objects:
Duplicating objects in Blender is a useful skill for creating repetitions or variations within your scene. Here’s how you can duplicate an object:
- Select the Object:
- Click on the object you want to duplicate in the 3D view. Ensure it’s highlighted, indicating that it’s selected.
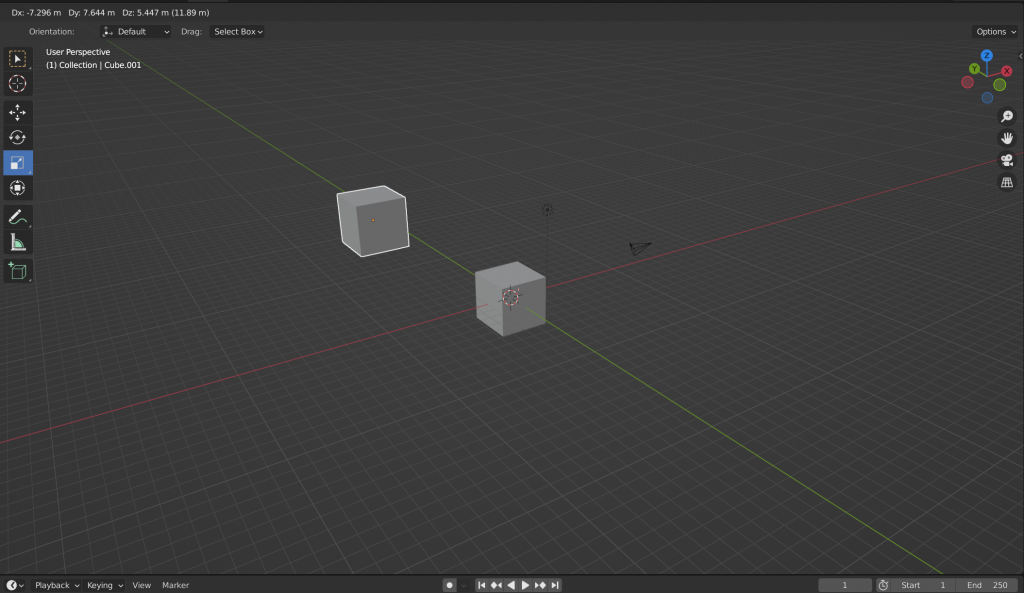
- Duplicate the Object:
- Press
Shift + Don your keyboard. This keyboard shortcut initiates the duplication process.
- Press
- Place the Duplicate:
- Move your mouse to position the duplicate where you want it in the 3D view.
- Confirm Placement:
- Left-click to confirm the placement of the duplicated object.
Now you have successfully duplicated an object in Blender. This method is effective for quickly populating your scene with multiple instances of the same object.
Deleting Objects:
Removing unwanted objects from your scene is a crucial step in maintaining a clean and organized workspace. Here’s how you can delete objects in Blender:
- Select the Object:
- Click on the object you want to delete in the 3D view. Ensure it’s highlighted, indicating that it’s selected.
- Delete the Object:
- Press the
Xkey on your keyboard. This opens a context menu.
- Press the
- Confirm Deletion:
- In the context menu, select “Delete” to confirm the removal of the selected object.
Alternatively, after selecting the object, you can press the Delete key on your keyboard and confirm the deletion in the pop-up window.
Tips and Considerations:
- Deleting Without Confirmation:
- If you want to delete an object without confirming in a pop-up window, you can press
Xand then pressEnterimmediately. This is a quick way to delete objects if you’re confident in your decision.
- If you want to delete an object without confirming in a pop-up window, you can press
- Deleting Multiple Objects:
- To delete multiple selected objects simultaneously, follow the same process. Blender will delete all the selected objects at once.
- Undo:
- If you make a mistake or accidentally delete an object, you can press
Ctrl + Zto undo the action.
- If you make a mistake or accidentally delete an object, you can press
Understanding the basics of duplicating and deleting objects in Blender lays the foundation for more complex scene management. As you progress in your 3D modeling journey, these skills will become second nature, allowing you to focus on bringing your creative vision to life in the digital realm.
Conclusion
In the realm of 3D modeling, embarking on the journey of creating basic objects marks the inception of a captivating and limitless exploration. Blender, with its intuitive interface and robust toolset, provides a gateway for both beginners and seasoned artists to sculpt their digital visions into tangible forms. As we conclude our exploration of creating basic 3D objects, several key takeaways come to light.
Firstly, understanding the fundamental elements of Blender’s interface, including the 3D view, toolbar, and properties panel, lays a solid foundation. Navigating this digital canvas becomes second nature, allowing artists to seamlessly bring their ideas to life.
The process of adding basic 3D objects, such as cubes and spheres, serves as a crucial initiation into the world of 3D modeling. Learning to manipulate, scale, rotate, and translate these objects provides a hands-on experience, empowering creators to shape their virtual landscapes with precision and creativity.
As artists delve into the intricacies of materials and textures, they discover the ability to breathe life into their creations. Blender’s material editor becomes a playground for defining the visual properties of objects, from vibrant colors to reflective surfaces, opening avenues for artistic expression.
Moreover, the journey doesn’t end with static objects; it extends into the dynamic realm of rendering. Previewing the 3D scene through Blender’s rendering engine unveils the potential for realism and aesthetic finesse. Lighting, materials, and camera angles come together in a symphony, transforming a digital space into a visual masterpiece.
In conclusion, creating basic 3D objects in Blender is not merely a tutorial in isolation; it’s an invitation to a world of boundless creativity. These initial steps set the stage for more advanced endeavors, from intricate modeling to elaborate animations. As aspiring 3D artists grasp the essentials, they gain the confidence to explore, experiment, and ultimately manifest their imaginative landscapes in the digital realm. The journey has just begun, and the possibilities are as expansive as the three-dimensional canvas itself.