
Exporting models for 3D printing in Blender involves several steps to ensure that your 3D model is prepared and formatted correctly for the printing process. Here is a step-by-step explanation of how to export models for 3D printing in Blender:
1. Model Creation:
Before exporting, create your 3D model in Blender. Ensure that the model is manifold (watertight), meaning it has no holes or intersecting faces.
2. Scale and Units:
Confirm that your model is in the correct scale for 3D printing. 3D printers typically use millimeters, so set Blender’s units to metric if they aren’t already. To check and adjust the scale, press N to open the Properties sidebar, and under the “View” tab, you’ll find the scale settings.
3. Check for Non-Manifold Geometry:
Run checks to identify and fix any non-manifold geometry. Non-manifold geometry can cause printing issues. Use Blender’s built-in tools or add-ons like “3D Print Toolbox” to identify and fix these issues.
4. Apply Scale and Rotation:
Press Ctrl + A and choose “Scale” and “Rotation” to apply these transformations. This step ensures that the scale and rotation are set to 1 and 0 respectively, preventing potential scaling issues when exporting.
5. UV Unwrapping:
If your model has textures, you might want to UV unwrap it to ensure that the textures map correctly onto the 3D surface.
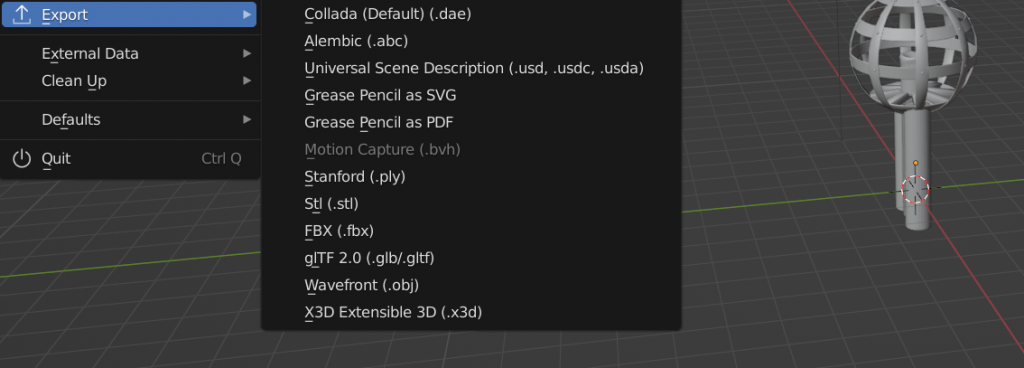
6. Export Format:
Go to “File” > “Export” and choose the appropriate file format. STL (STereoLithography) is the most common format for 3D printing. Select STL, and a settings panel will appear.
7. STL Export Settings:
In the STL export settings, make sure to:
- Check “Selection Only” if you want to export only the selected objects.
- Set the “Units” to “None” or “Millimeters,” depending on your preference or printer requirements.
- Adjust other settings as needed.
8. Export:
Click “Export STL” to save the file to your desired location.
Choosing the Right File Format
Choosing the right file format in Blender is crucial, as it determines how your 3D model will be stored, shared, and used across different applications. Blender supports various file formats, each with its own advantages and use cases. Here’s a guide to help you choose the right file format in Blender based on your needs:
- Blend (.blend):
- Pros: Preserves all aspects of the Blender project, including materials, textures, animations, and more.
- Cons: Not universally supported by other 3D software.
- Use When: Sharing projects with other Blender users or archiving your work with all details intact.
- FBX (.fbx):
- Pros: Widely supported across different 3D software, including game engines.
- Cons: May not perfectly translate complex materials and may require some adjustments.
- Use When: Collaborating with users of other 3D software, especially in the context of game development or animation pipelines.
- OBJ (.obj):
- Pros: Universally supported, including many CAD applications.
- Cons: Doesn’t support some advanced features like animations or complex materials.
- Use When: Transferring models to non-Blender users, especially in the context of 3D printing or collaboration with CAD software.
- STL (.stl):
- Pros: Standard format for 3D printing, widely supported in manufacturing and prototyping.
- Cons: Limited in terms of color, materials, and other advanced features.
- Use When: Exporting models for 3D printing or sharing basic geometric shapes.
- Collada (.dae):
- Pros: Supports geometry, materials, animations, and is an open standard.
- Cons: File sizes can be larger, and some software may have issues with certain features.
- Use When: Collaborating with software that supports Collada or for general interchange between 3D applications.
- PLY (.ply):
- Pros: Supports both ASCII and binary formats, can store color information.
- Cons: Less common in some applications, may not support advanced features.
- Use When: Dealing with point cloud data or when color information needs to be preserved.
- 3MF (.3mf):
- Pros: Supports 3D printing features, color, and material information.
- Cons: Less widely supported compared to STL.
- Use When: Specifically for 3D printing applications that support the 3MF format.
When choosing a file format, consider the specific requirements of your project and the software or hardware you plan to use. Always check the compatibility and capabilities of the chosen format to ensure that your 3D models are transferred accurately and efficiently between applications.
Exporting Textures and Colors
Exporting textures and colors along with your 3D model from Blender is crucial when you want to preserve the visual details of your work. Here’s a guide on how to export textures and colors based on the common file formats:
Exporting Textures:
- UV Unwrapping:
- Before exporting textures, ensure that your model has been UV unwrapped. UV unwrapping is the process of mapping a 2D texture to a 3D model.
- Assign Materials:
- Make sure your model has materials assigned to it, and each material is properly configured with textures (diffuse, specular, normal maps, etc.).
- Image Texture Formats:
- Blender supports various image formats for textures, such as PNG, JPEG, TIFF, or TGA. Choose a format based on your quality and compression preferences.
- Pack Textures (Optional):
- In Blender, you can use the “File” > “External Data” > “Pack All into .blend” option to pack your textures into the Blender file. This is optional but can be useful for keeping all assets in one file.
- Save Images:
- To export individual textures, open the Image Editor, select the texture you want to export, and click “Image” > “Save As.” Choose the desired format and location.
- Exporting UV Layout (Optional):
- For hand-painting or editing in external software, you might want to export the UV layout as an image. Go to the UV Editing workspace, select all UVs, and export the layout as an image.
Exporting Colors:
- Vertex Paint or Materials:
- Colors in Blender can be achieved through vertex paint or by assigning materials with color properties. Ensure that you’ve applied colors using one of these methods.
- Material Colors:
- If you’ve used materials to color your model, make sure the color information is properly configured in the material settings.
- Viewport Display Settings:
- Blender’s viewport display settings allow you to preview materials and colors. Ensure that the viewport displays the colors as intended.
- Check Shader Editor:
- If you’ve used complex shading nodes, check the Shader Editor to ensure that the color information is not reliant on external factors (like environment maps).
Exporting Both Textures and Colors:
- Choose File Format:
- When exporting your 3D model, choose a file format that supports both geometry and texture information. Formats like FBX, OBJ, and Collada are common choices.
- Texture Path Configuration:
- Some formats may require additional configuration for texture paths. Ensure that the texture paths are set correctly, especially if you plan to move the exported file to another location.
- Include Material Libraries (if applicable):
- Some formats, like FBX, allow you to embed material libraries. This ensures that the material definitions, including colors and textures, are preserved when importing into other software.
- Export:
- Click the “Export” button to save your 3D model with textures and colors. Make sure to check the export settings for any additional options related to textures and colors.
- Test in External Software:
- Open the exported file in an external 3D viewer or another 3D software to confirm that the colors and textures are accurately transferred.
By following these steps, you can export your 3D model from Blender while preserving the textures and colors, allowing for a seamless integration into other workflows or applications. Always refer to the documentation of the target software or platform to understand any specific requirements or considerations for texture and color export.
Conclusion
Exporting models for 3D printing in Blender is a meticulous process that requires attention to detail to ensure a successful transition from the digital realm to the physical world. By following a systematic approach, including proper model creation, scale considerations, manifold geometry checks, and format-specific export settings, users can optimize their 3D models for seamless integration with 3D printing technologies.
The importance of choosing the right file format, such as STL, and configuring export settings cannot be overstated. These choices directly impact the compatibility of the model with 3D printers and other software, ensuring that the intricate details, scale, and geometry of the design are accurately represented in the printed object.
Moreover, the emphasis on UV unwrapping, applying scales and rotations, and addressing non-manifold geometry underscores the need for precision in the modeling process. These steps not only contribute to the successful export of models but also enhance the overall printability and quality of the final 3D-printed product.
As the field of 3D printing continues to evolve, staying informed about advancements in software, printer technologies, and export standards becomes crucial. By adhering to best practices and staying abreast of industry developments, Blender users can navigate the intricacies of exporting models for 3D printing with confidence, unlocking the full potential of their creative endeavors in the realm of physical fabrication.