
Modifiers in 3D modeling play a crucial role in enhancing efficiency, flexibility, and creativity in the design process. They are tools in software like Blender that allow users to dynamically alter the geometry of objects without making permanent changes. These modifiers can be applied to meshes, curves, and other objects, providing a non-destructive workflow.
Here’s an explanation of some common modifiers in Blender:
- Subdivision Surface Modifier:
- Function: Increases the mesh resolution by subdividing its faces, creating a smoother surface.
- Usage: Ideal for adding detail to low-poly models.
- Mirror Modifier:
- Function: Mirrors the geometry of an object across a specified axis.
- Usage: Efficient for modeling symmetrical objects, as changes on one side are automatically mirrored to the other.
- Array Modifier:
- Function: Creates an array of duplicates based on the original object, either linearly or radially.
- Usage: Useful for creating repetitive patterns or objects with regular spacing.
- Boolean Modifier:
- Function: Performs boolean operations (union, difference, intersection) between two objects, creating a new mesh as a result.
- Usage: Useful for combining or cutting out shapes from other shapes.
- Bevel Modifier:
- Function: Adds bevels to the edges of the mesh, rounding them off.
- Usage: Enhances the realism of objects by smoothing sharp edges.
- Solidify Modifier:
- Function: Gives thickness to a mesh by extruding its faces.
- Usage: Useful for creating 3D-printable models or adding volume to flat surfaces.
- Displace Modifier:
- Function: Displaces vertices based on a texture or another mesh, creating a distorted effect.
- Usage: Useful for creating natural irregularities like terrain or organic shapes.
- Lattice Modifier:
- Function: Deforms the mesh by using a lattice object to control the transformation.
- Usage: Provides a way to shape complex objects in a more intuitive manner.
- Curve Modifier:
- Function: Deforms an object along a curve.
- Usage: Useful for creating dynamic shapes like helixes or paths for animations.
- Remesh Modifier:
- Function: Reconstructs the geometry of an object to create a more even and simplified mesh.
- Usage: Helpful for refining and optimizing complex geometry.
Modifiers in Blender offer a non-destructive way of modeling, allowing artists to experiment with various effects and changes without committing to a permanent alteration of the original geometry. Understanding and effectively using modifiers can significantly enhance the speed and flexibility of the 3D modeling workflow.
Applying Modifiers
Applying modifiers in Blender is a crucial step in the 3D modeling process. While modifiers provide a non-destructive way to manipulate objects, applying them makes the changes permanent and affects the underlying geometry. Here’s a step-by-step guide on how to apply modifiers in Blender:
Applying Modifiers in Blender:
- Select the Object:
- Open Blender and select the object to which you want to apply the modifier. Ensure that the object is in Object Mode.
- Access the Modifier Panel:
- In the Properties Editor, navigate to the Modifier tab. This tab is represented by a wrench icon.
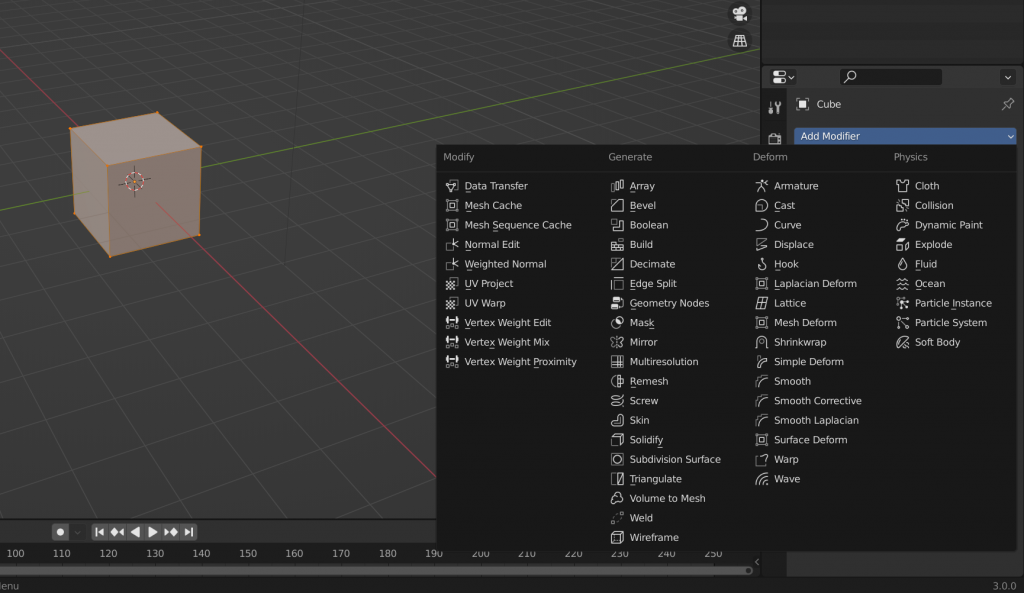
- Choose the Modifier:
- Locate the modifier you want to apply in the list. Click on the dropdown arrow next to the “Add Modifier” button to see the list of modifiers available in Blender.
- Adjust Modifier Settings (if needed):
- Before applying the modifier, make sure that the settings for that modifier are adjusted as desired. Different modifiers have different parameters that can be fine-tuned to achieve specific effects.
- Apply the Modifier:
- To apply the modifier, click the “Apply” button. This permanently alters the object’s geometry based on the settings of the modifier.
- Check the Result:
- After applying the modifier, check the result in both Object Mode and Edit Mode. You’ll notice that the changes are now part of the object’s actual geometry.
- Repeat for Multiple Modifiers:
- If your object has multiple modifiers, you need to apply them one by one, in the order they appear in the modifier stack. The order can affect the final result, so it’s essential to consider the sequence in which you apply the modifiers.
- Edit the Geometry (if needed):
- Once a modifier is applied, you can further edit the geometry in Edit Mode. However, keep in mind that some modifiers might create complex geometry, making manual edits more challenging.
- Remove Unused Modifiers:
- If you have modifiers that are no longer needed after applying others, you can remove them by clicking the “X” icon next to the modifier’s name in the Modifier tab.
Applying modifiers in Blender is a crucial step, especially when finalizing your 3D model for export or rendering. It’s important to strike a balance between using modifiers for flexibility and applying them when you’re satisfied with the model’s current state.
Modifier Stack and Order
In Blender, the modifier stack refers to the order in which modifiers are applied to an object. The modifier stack is a hierarchical list of modifiers that affect the object’s geometry in a cumulative way. Understanding the modifier stack and the order in which modifiers are applied is essential for achieving the desired results in 3D modeling. Here’s an overview of the modifier stack and its significance:
Modifier Stack Overview:
- Hierarchical Order:
- The modifier stack is a list that represents the order in which modifiers are applied to an object. The order matters because each modifier in the stack operates on the modified geometry generated by the modifiers above it in the list.
- Bottom to Top Execution:
- Modifiers at the bottom of the stack are applied first, followed by those above them. This bottom-to-top execution means that each modifier operates on the modified geometry produced by the previous modifiers in the stack.
- Modifier Panel in Properties Editor:
- The modifier stack can be found in the Properties Editor under the “Modifier” tab, represented by a wrench icon. Here, you can see the list of modifiers applied to the selected object in their hierarchical order.
- Changing Modifier Order:
- You can change the order of modifiers by dragging them up or down in the stack. This can significantly impact the final result, so it’s crucial to experiment with the order to achieve the desired effect.
- Influence of Order on Results:
- The order in which modifiers are applied can dramatically affect the appearance and behavior of the object. For example, applying a Subdivision Surface modifier before a Bevel modifier can yield a different result than applying the Bevel modifier first.
- Non-Destructive Workflow:
- One of the key advantages of the modifier stack is that it allows for a non-destructive workflow. Before applying modifiers, you can experiment with different settings and orders, easily making changes and adjustments.
- Understanding Dependencies:
- Some modifiers may depend on the output of others. For instance, a Mirror modifier depends on the base geometry before mirroring it. Being aware of these dependencies helps in creating a logical and efficient modifier stack.
- Mixing Deform and Generate Modifiers:
- Modifiers can be broadly categorized as deform and generate modifiers. Deform modifiers alter the object’s shape, while generate modifiers create new geometry. Mixing these types in a strategic order can produce complex and intricate results.
- Multiple Objects and Stack:
- Each object in Blender has its own modifier stack. When working with multiple objects, it’s important to consider how the modifier stack order influences each object individually.
- Reordering and Visibility:
- You can hide or disable specific modifiers in the stack to see the isolated effect of each one. This can be useful for fine-tuning and understanding the contribution of each modifier.
Careful consideration of the order and settings of modifiers in the stack is crucial for achieving the desired results and maintaining an efficient workflow.
Using Modifiers in Modeling Workflows
Using modifiers in Blender is a fundamental aspect of 3D modeling workflows, providing a powerful and flexible approach to creating complex and detailed objects. Modifiers allow for non-destructive editing, making it easier to experiment with designs, optimize geometry, and enhance efficiency in the modeling process. Here’s a guide on how to integrate modifiers into your modeling workflows in Blender:
1. Understanding the Object’s Structure:
- Before applying modifiers, understand the structure and purpose of the object you’re modeling. Identify areas where modifiers can enhance efficiency, such as creating repetitive patterns, adding details, or maintaining symmetry.
2. Non-Destructive Editing:
- Take advantage of modifiers to maintain a non-destructive workflow. By keeping modifiers in the stack, you can easily tweak settings, reorder modifiers, or disable them to experiment with different looks without permanently altering the base geometry.
3. Symmetry and Mirror Modifiers:
- Use the Mirror modifier to model symmetrical objects efficiently. This allows you to work on one half of the model, with changes automatically reflected on the other side. It’s particularly useful for characters, vehicles, and architectural elements.
4. Detailing with Subdivision Surface:
- Employ the Subdivision Surface modifier to add smoothness and detail to your models. This is especially valuable for organic shapes and curved surfaces. Adjust the subdivision levels to balance detail and performance.
5. Creating Patterns with Array Modifier:
- Utilize the Array modifier to create repetitive patterns or arrays of objects. This is beneficial for designing fences, arrays of windows, or any structure that requires regular spacing.
6. Complex Shapes with Boolean Operations:
- Combine and cut shapes with the Boolean modifier to create complex objects. This is helpful for creating intricate designs or combining separate elements into a cohesive whole.
7. Beveling for Realism:
- Enhance the realism of your models by adding bevels to edges using the Bevel modifier. Bevels simulate the way light interacts with surfaces, making objects look more natural and less angular.
8. Volume with Solidify Modifier:
- Add thickness to surfaces using the Solidify modifier. This is particularly useful for creating 3D-printable models or giving depth to thin surfaces.
9. Procedural Deformations with Displace:
- Use the Displace modifier to create organic and procedural deformations on your objects. This modifier displaces vertices based on a texture or another object, allowing for realistic irregularities.
10. Optimizing Geometry with Remesh:
Employ the Remesh modifier to optimize and simplify complex geometry. This can be useful for reducing polygon count, making it easier to work with and improving performance.
11. Animating Along Paths with Curve Modifier:
Animate objects along paths by using the Curve modifier. This is effective for creating dynamic animations, such as vehicles moving along roads or cameras following specific trajectories.
12. Experiment and Iterate:
Don’t be afraid to experiment with different modifier combinations and settings. Blender’s non-destructive workflow allows you to iterate quickly and refine your models until you achieve the desired result.
Incorporating modifiers into your modeling workflows in Blender opens up a world of possibilities, enabling you to create intricate designs with greater efficiency and flexibility. Understanding how to leverage these modifiers can significantly enhance your 3D modeling capabilities.
Common Modifier Pitfalls and Solutions
While modifiers in Blender are powerful tools for enhancing the 3D modeling workflow, they come with their own set of challenges. Understanding common modifier pitfalls and their solutions is crucial for maintaining a smooth and effective modeling process. Here are some typical issues users may encounter with modifiers in Blender and how to address them:
1. Unexpected Geometry Artifacts:
- Issue: Applying certain modifiers may lead to unexpected artifacts, such as overlapping faces, non-manifold geometry, or distorted surfaces.
- Solution: Check the order of your modifiers in the stack, adjust their parameters, and ensure that the base geometry is clean. Use the “Merge” options in modifiers like Mirror to eliminate duplicate vertices.
2. Performance Issues with Subdivision Surface:
- Issue: The Subdivision Surface modifier can significantly increase the polygon count, leading to performance issues in large or complex scenes.
- Solution: Adjust the subdivision levels judiciously to balance detail and performance. You can also use the modifier only during the modeling phase and disable it when not needed for better interactivity.
3. Boolean Operation Failures:
- Issue: Boolean modifiers may fail, especially when dealing with complex or non-manifold geometry, leading to unexpected results.
- Solution: Simplify the geometry where possible before applying boolean operations. Consider using the “Clean Up” tools or manually fixing issues in Edit Mode. In some cases, using the Boolean modifier before other modifiers in the stack may help.
4. Mirror Modifier Issues:
- Issue: The Mirror modifier may behave unexpectedly, especially if the object’s origin is not correctly set or if there are scale issues.
- Solution: Ensure the object’s origin is at the center of the mirroring axis. Apply scale (Ctrl+A) before using the Mirror modifier. Check and correct any issues with the object’s scale or rotation.
5. Array Modifier Offset Problems:
- Issue: When using the Array modifier, achieving the desired offset between duplicated elements can be challenging.
- Solution: Adjust the “Relative Offset” or “Constant Offset” values in the Array modifier to control the spacing between duplicates. You can experiment with negative values, as they can affect the direction of duplication.
6. Unintended Deformations with Deform Modifiers:
- Issue: Deform modifiers, such as Lattice or Curve, may unintentionally deform the object in undesired ways.
- Solution: Adjust the control points of the deform modifier, and ensure that the modifier is correctly influencing the intended areas. Check for any unwanted transformations in the object’s origin or scale.
7. Overlapping Faces with Solidify Modifier:
- Issue: The Solidify modifier may create overlapping faces or distorted geometry, particularly on complex shapes.
- Solution: Adjust the Thickness parameter carefully and ensure that the original geometry is well-defined. In some cases, using the “Even Thickness” option can help maintain a more consistent result.
8. Excessive Vertex Count with Remesh:
- Issue: The Remesh modifier may generate an excessively high vertex count, impacting performance.
- Solution: Adjust the “Octree Depth” parameter to control the level of detail. Experiment with lower values for a simplified mesh while maintaining the overall shape.
9. Curve Modifier Path Issues:
- Issue: When using the Curve modifier, the object may not follow the path as expected.
- Solution: Ensure that the curve is properly aligned with the object’s origin. Adjust the object’s alignment and rotation, and use the “Deform Axis” settings in the Curve modifier to control the orientation.
10. Modifier Dependencies:
**Issue:** Some modifiers may depend on the output of others, leading to unexpected results when changing the order.
- **Solution:** Be aware of modifier dependencies and consider the order in which they are applied. Test different orders to achieve the desired outcome.
11. Modifier Interaction Issues:
 **Issue:** Combining multiple modifiers can sometimes lead to unpredictable interactions.
- **Solution:** Experiment with different modifier orders. Temporarily disable or apply modifiers to isolate issues. Understanding how modifiers interact can help you troubleshoot effectively.
12. Memory Usage and Performance:
**Issue:** Heavy use of modifiers can lead to increased memory usage and reduced performance, especially in complex scenes.
- **Solution:** Use modifiers judiciously, and consider applying or disabling modifiers when not actively needed. Utilize Blender's optimization tools to reduce polygon count and improve overall scene performance.
13. Edge Creases with Bevel Modifier:
**Issue:** The Bevel modifier may create undesired creases or artifacts on certain edges.
- **Solution:** Adjust the "Width" and "Segments" parameters in the Bevel modifier to control the smoothness of the bevel. Manually edit edge creases in Edit Mode for finer control.
14. Animating Issues with Modifiers:
**Issue:** Modifiers may behave unexpectedly when animating objects.
- **Solution:** Be cautious when animating objects with modifiers, especially if the modifiers significantly alter the geometry. Test the animation at different frames to ensure the modifiers behave as expected.
15. Exporting and Applying Modifiers:
**Issue:** Exporting models with modifiers may not always yield the desired results in other software or engines.
- **Solution:** Apply modifiers before exporting if needed, keeping in mind that this makes changes permanent. Test the exported model in the target software to ensure compatibility.
Understanding common modifier pitfalls and employing the suggested solutions will help you navigate challenges and optimize your workflow in Blender. Modifiers are powerful tools, but knowing how to troubleshoot potential issues is essential for achieving the desired results in your 3D modeling projects.
Conclusion
In wrapping up our exploration of modifiers in Blender, it becomes evident that these tools constitute a cornerstone in the realm of 3D modeling.
Their versatility, combined with the non-destructive nature they bring to the creative process, marks a paradigm shift in the way digital artists approach design. From refining surface details with Subdivision Surface to achieving symmetry effortlessly with the Mirror modifier, Blender’s modifier arsenal empowers users to sculpt, refine, and experiment with unprecedented flexibility.
The introduction to modifiers is not merely an initiation into a software feature; it’s an invitation to a realm where artists can iterate, refine, and elevate their creations, unburdened by the fear of irreversible changes. As users delve deeper into the intricacies of each modifier, they unlock a spectrum of possibilities, from intricate pattern creation with Array to dynamic animations guided by the Curve modifier.
This introduction is a stepping stone, laying the foundation for a journey where mastery of modifiers becomes synonymous with pushing the boundaries of imagination. In essence, modifiers in Blender are not just tools; they are catalysts for innovation, providing a canvas where digital artistry flourishes in a tapestry of shapes, structures, and narratives. The exploration has just begun, and as artists venture forth, modifiers in Blender stand as companions, ushering them into a realm of boundless creativity, where every tweak, every adjustment, becomes a stroke in the masterpiece of 3D design.